Friday 30 December 2016

Migration to Kingdom – 408 AD

Synopsis
In 407, Constantine III had signed a treaty with the invaders and moved south to confront Stilicho. Gothic forces lead by Sarus, a general of Stilicho, had some successes but are eventually defeated by Constantine’s magister militum, Gerontius. In the spring of 408, Stilicho gathers new forces to resume his fight against Constantine III. Constantine III, after gaining control of Arelate (Arles) makes his son Constans Caesar and sends him to Hispania to capture the relatives of Honorius. They are later executed to further securing his position as “emperor” in the west. 

Barbarian Player
The treaties signed by the barbarian leaders would recognize a status quo and pledges of no further movement. Naturally, treaties between the barbarians and Rome have seldom demonstrated longevity, so the barbarian player will need to mark time and accumulate as many points as he can.  However, this will cause discord among a number of tribal leaders not only within the Vandal camp, but among the Alan and Suevi.

There are two directions to reflect this and one, is to increase the points required to move barbarian counters and two, prohibit the replacement of troops from within ones on tribe. The latter option reflects those tribes that remained in the province to settle or tribes that joined other nations to trek further west.

Both options will be tested.

Roman Player
The primary threat to Constantine III’s position is not the barbarian threat, but Stilicho’s new offensive. Constantine III moves south to take control of Arelate (Arles) which would place him in a better position to threaten western Italia. Gallia has become supportive for their new emperor. 

The Franks will return to their province of Germania II if it is no longer threatened by the barbarian presence. Despite the treaties made with the barbarians, the provinces of Gallia are hesitant to release their troops to join the main army of Constantine III’s army. Therefore any losses of Roman troops cannot be replaced until August 408.

Game map two.

In map two, as we move further west we note the appearance of new provinces. These should be the provinces of Lugdenensis Senonia, Lugdenensis I, II and III, Aquitania I and II. 


Tuesday 27 December 2016

Migration to Kingdom - Scenario test – 407 AD

In January of 407, the barbarian horde had crossed the Rhine sending Roman-Gaul into a panic. This not only included the armies of the Vandal, Alan and Suevi but the civilians of each nation. Following the campaign rules, further movement would have to be generated from building activity points during each player’s turn. Both sides focused on the task ahead for the months of January and February.


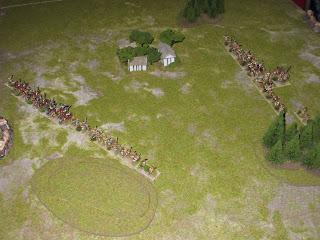
Anxious to contain the invasion, the Franks seized the opportunity to launch an attack against the Vandals still occupying Germania I. The two armies, with nearly identical composition [1], met near the foothills of the Vosges Mountains. Holding the advantage of terrain, the Franks attacked the heavy Vandal columns. The battle was brief with the Franks drawing off leaving the Vandals to hold the battlefield.

In March, leaving their civilians behind in Germania I, the vanguard of each barbarian horde moved deeper into Roman territory to plunder Belgica I. In that same month, Constantine III and the army of Britannia landed in northern Gallia.


Constantine III having declared himself emperor spent the summer securing his position in Gaul by building his resources (points) and coordinating plans with the Franks to attack the barbarians. The brief respite brought gains for Constantine III and by the end of the summer he would be ready to march. Leaders among the barbarians were experiencing difficulties in coordinating priorities and they too could feel an attack was imminent.

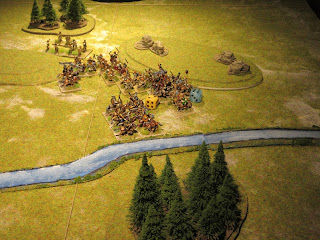
That attack came in August with the Franks launching their second attack on the Vandals. Aided by a contingent of Roman troops [2], the Franks caught the Vandals off balance. The Vandal army acquitted themselves well and forced the Romano-Franks off the field, but at a heavy cost to themselves (4 – 3).

September saw the invaders moving their family and their belongings to Belgica I leaving Germania I a barren wasteland. Constantine III, unperturbed by the Frankish defeat, caught the same Vandal horde in the Loire valley and with superior numbers, including a contingent of Franks; the Romano-Franks handily beat the barbarians. This was the first defeat for the Vandals, but a major setback as it reduced the overall effectiveness of its army to half strength.


The months of October and November, Roman troops harried the barbarian foragers placing them in critical supply (no activity points were won [3]).

December, winter quarters for the Roman and Frankish armies.

[1] The Vandal commander’s element was the only mounted unit for the battle.
[2]  Roman and Frankish commands could supply each other with a contingent of three elements.
[3]  The only activity points won by the barbarian player were used to move all his counters to the adjacent province, therefore replacing battle casualties was not possible.

Assessment
The barbarian player having brought all of his counters out of Germania I and relocating them further west secured him a technical win. The Vandals have been seriously weakened leaving a good many tribal leaders demanding a new king.


The Roman player took advantage of the summer period to build a good reserve of activity points and these will be carried over to the next scenario. Focusing on one of the barbarian horde and not all three was smart. Next year Honorius would certainly send Stilicho with an army and Constantine III would need a veteran force for that fight.  

Monday 26 December 2016

Migration to Kingdom, 407 AD

Synopsis
This first scenario begins in January of 407 AD with the Vandals, Alans and Suevi having crossed the Rhine near Mogontiacum (Mainz). It was not long before news of their crossing had spread throughout the adjacent provinces of Germania I, but with the field army of Gallia still deployed in Italia, local military and civil officials were no doubt preparing their cities for the eventual sieges that would follow.

For the initial series of tests we have two players, one for the barbarian side and a second playing Rome.
This had the barbarian player responsible for the movement of three nations and the Roman player would have initially the Franks (foederati) and eventually the army of Britannia (Constantine III) for his use.

Barbarian Player
Each barbarian nation is represented by two counters; one representing its civilians and second counter, the tribal army. The counters are not stacked and therefore will require the standard point cost to move to the next province. Having each counter move independently demonstrated the need to forage, plunder and further illustrates the lack of cooperation among the tribes to assist one another. Taking this a step further, each of the barbarian army commands should represent a confederation of smaller tribes and may experience movement obstacles; this may operate along similar line to the DBA rule for "allied contingents".   

Roman Player
At the start of the game, Roman militia garrison each of the provincial capitals and will not leave their respective cities. Germania II is home to the Franks and as Foederati they have an agreement to defend Roman territory. The Franks are represented by an army counter and moving it requires the same point cost as stated in the campaign rule set.

Starting in Britannia is Constantine III, represented by an army counter. His departure to Gallia is set for early spring and his arrival coincides with his declaring for the “purple” so the Roman player will not only need to focus on the immediate threat that the barbarians pose but also any retaliatory actions taken by Imperial Rome.

Objectives for 407 AD.
Historically the migration took nearly three years to reach a conclusion, therefore the complete destruction of all the barbarian nations as a Roman victory condition should be deemed unrealistic; considering any command may restore its losses using activity points. 

At the moment I am considering a successful conclusion for the barbarian player as the displacement of all six counters further into Gallia, which would mean leaving Germania I to an adjacent province, as this can no longer sustain the tribes.

The Roman player assumes the role of Constantine III at the start of the game. The Franks are his sole army command to contain the barbarian horde until his own troops from Britannia arrive. Therefore, keeping the horde contained in Germania I would greatly enhance his prestige so I am considering a scale of success based on the number of counters that remain in Germania I. This may change, but it remains a reasonable start.

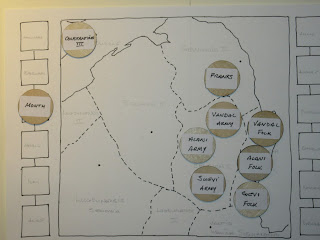
Game map one.
This first scenario will play out over the provinces west of the Rhine and these are Germania I and II, Belgica I and II, Lugdunenesis Senonia and Lugdunensis I.  

Saturday 24 December 2016

From Migration to Kingdom – the campaign

During the past months, readers of the blog have noted a number of test campaigns based on the nomadic steppe types invading the Roman or Sassanid empire. “Migration to Kingdom” steps away from the usual military campaign as it is based on the barbarian crossing of the Rhine in 406 AD and ends with them reaching Hispania. Selecting this event as theme for a campaign posed a number of problems with regard to available information, yet such a campaign would offer much play potential.

Let me preface this by stating briefly the situation. At the turn of the 5th century AD, both halves of the Roman Empire were odds with one another as how best to handle the Gothic situation in Illyria and Thrace. This was quickly followed by a number of Germanic invasions of Raetia and the Pannonian provinces; both critical situations which had drawn off the Gallic field army to combat the incursions. The situation was further exacerbated by Saxon invasions of Britannia from across the channel coupled with the Picts and other tribes invading from the north and all combined to leave Gaul ripe for an invasion from across the Rhine.


The Barbarians
The migrating horde, formed primarily of Vandals (Asding and Siling), Alans and Suevi which included a number of Germanic tribes numbered a conservative 100,000 to half a million. To describe the invasion as coordinated is an overestimation as they were capable of fighting amongst themselves as against Rome resulting with the smaller tribes breaking away to seek a safe haven elsewhere. It is documented that concentrations of Alan settled around Paris and southern Gaul and likewise, the Burgundi found new lands in the southern regions.

The end date for the migration is generally recorded as the fall of 409 AD and knowing this I decided to design the campaign as three separate scenarios, one for each year. This campaign most likely would not be completed in one evening, but certainly within three. Then with each scenario defined by set parameters and objectives this offered players the advantage of rotating as a Roman or barbarian player.

Rome
In designing the scenarios I did not want to place too enormous a burden for the Roman player, but historically this was a tumultuous period for Rome. Stilicho had beaten the Vandals of Radagaisus and before his plans to free Illyricum from the Goths of Alaric, Gildo, a Roman general, led a revolt in Africa threatening the grain supply for Rome. And at the end of 406 AD one of the largest migrations of barbarians took place.

It may seem that the Roman player would be dealt a bad hand there are a number of factors that play in his favour; the Franks and the arrival of Constantine III from Britannia with an army.

Play test

In the coming weeks I will be testing each of the scenarios and included will be some form of internal rivalries among the barbarian tribes which may produce battles smaller than the usual twelve elements per side. 

Saturday 17 December 2016

Campaign rule options - stratagems

Choosing the battlefield.

Determining the battlefield, using DBA 3.0, the defender selects from his home terrain and places compulsory and optional features on the game board by casting a die for the quadrant in which they are to be positioned in. When completed, the attacker selects a side for his deployment area and the defender takes the opposite side for his. Reading military history one may encounter battles fought over terrain which might not quite fit the options listed as home terrain for an army and our campaign system does take this into consideration. One example from the campaign examples given here had the Bosporan army fight the Alan in a series of battles over steppe, littoral and arable terrain with the defender selecting features from the terrain type given.

The stratagem “choosing the battlefield” will offer the attacker the choice of which terrain items are to be placed by the defender. This option will help cavalry armies avoid battle where terrain features are of maximum size or bad going and conversely, an infantry army fighting a highly mobile one would prefer fighting over restricting ground.

The option cost 2 points to purchase and the stratagem counter is presented to the defender before the placement of terrain. The attacking player selects the terrain pieces to be placed which must fulfill the rough/bad going requirement and feature size.

Note:

Over the past year, much of my terrain has been refurbished and new features have been added to increase the size options of difficult hills, wood, etc.  Some features have also taken a modular form, such as the hamlet (BUA) or plough which can be used in its minimum to maximum size; the photos here illustrate the modular system described.

Grain fields.


Hamlet (BUA) sections.


Hamlet and fields.


Thursday 15 December 2016

Campaign rule options - stratagems

The Flank March

The flank march has been used as an option in a number of Ancient Rule sets including WRG. Some systems require noting their turn of arrival or determine this by casting a die. Rather than follow this method we approached this from a different perspective and decided to tie the flank march to a player’s pip score as is similarly done to determine if plough is rough going or to cease the sacking of a city.

The player conducting a flank march selects 1 -3 elements of any type (excluding the command element) to be kept off table and notes which board edge they are to appear. This must be outside the opponent’s deployment zone. The player may choose when his flank march arrives but must spend pips for this, however, the score increases by + 1 for each turn they are kept off table. 

In the example below, the Gepid player moves forward during his first turn. Casting a PIP score of six on his second turn, the Gepid player brings his flanking column on to the table for 2 PIPs, makes a tactical move + 1. plus an extra + 1 for outside command distance from the general. The Gepid player now has 2 PIPs remaining to use for the main body.

Gepid vs. Tervingi (defender)


Turn two, the arrival of the flank march column.


Wednesday 14 December 2016

Campaign rule options - stratagems

Rapid Deployment.

This option simulates the condition where an attacker has closed the distance between deployment areas faster than expected, leaving the defender scrambling to deploy in front of his camp. Livy records a few instances of this ploy during the campaigns in Hispania, 2nd c. BC.

This stratagem allows the defender to place the terrain as per rule set and the attacker selects a board edge for his area of deployment followed by the defender placing his troops opposite. The attacker presents the Stratagem – Rapid Deployment counter and the defender moves his entire deployment directly back 3BW allowing the attacker to position his troops from the centre line. 

In this example, the Gepid have made a rapid deployment forcing the Tervingi to deploy close to their wagon laager.


The attacker not only threatens his opponent’s camp due to the closer proximity of his army, but now denies the defender any advantageous terrain previously held. 


Do note, if the defender is also using a stratagem, any ambush will need to re-consider the attacker’s deployment area, a flank march cannot change its arrival point, but may arrive earlier and a rapid deployment will cancel each other as both generals had similar plans. 

Tuesday 13 December 2016

Campaign rule options - stratagems

Play testing rule options.
During the development of our DBA campaign system we played with the idea of adding stratagems as an option. Invariably through the course of a campaign season a player could experience a number of setbacks such that implementing a cunning stratagem might even their chance of success. 

Stratagems would be available to all players but need to be purchased during the campaign phase - adding reinforcements and supply. Due to their expense a player must plan ahead and build a sufficient reserve of points, however, this may prove difficult as supply and reinforcements will take a higher priority. 

The following stratagems were taken from the classic books written by Frontinus and Polyaenus and should prove useful and are easily be integrated into the DBA system.

The Ambush.
The ambush option functions similar to the HOTT rule allowing Lurkers to appear on the table from a hidden position. Up to 3 elements of any “fast” troop type, excepting fast horde (5Hd), may be used to set an ambush. These will be placed during the player’s turn in any  rough or bad going terrain feature and move into contact. This is particularly useful if done in conjunction with an enemy already engaged in combat. 

This costs two pips per element to appear and make a tactical move and remain on the board as any other element within the command. They need not all appear at once.

Test game. Tervingi vs. Gepid, Terrain type: Arable; BUA, difficult hill, 2 x woods.

The Gepid as defender had the option to set an ambush and for this they set two Ps aside. Seeing the Gepid formed at the base of the difficult hill, the Tervingi infantry approached in deeper formation with the noble cavalry in support on the right. Wary that the hamlet harbored enemy troops, the Tervingi skirmishers would screen the left flank from possible ambush while skirmishers on the left would clear the hamlet. 


During the battle, Gepid skirmishers, located in the Hamlet, sprung their ambush on the Tervingi light troops entering it. As the battle progressed, the Gepid increased their lead to 3 – 0 and now launched their second hidden element; this one moved toward the Tervingi camp causing more anxiety to the Gepid opponent. 


Battle concluded to a 5 - 2 victory for the Gepid.

Next stratagem, the flank march.

Monday 12 December 2016

Barbarian Gallery

Over the past month I have added a number of 4th/5th c. barbarian armies to the collection. Some, due to their composition,  are easily recognizable, such as the Greuthingi (Goths) comprising of six cavalry (3Kn) and six archers (Ps). Others less so, as they consist of a large number of warband and two or three cavalry elements. With the exception of the Franks, warriors are clothed very similar that shield patterns are the only way to separate one army from another.

Here then are photos of the Tervingi, Gepid, Franks, and Burgundi who now join the previously completed Huns, Alani, Carpi and Sarmatian armies.The miniatures are all Old Glory 15's and considering that many of the figures had their weapons cast along the torso or face I am pleased how every thing turned out This was no small effort to cut the weapons free from their fixed position, however, once free the arm could be re-positioned to give the group an animated look. The Draco standards are milliput on a brass wire frame and a number of foot elements carry them as these can serve as command stands for those armies offering a dismounted general (4Wb). 

Tervingi and Early Visigoths (II/65b)


Greuthingi (II/67b)


Early Frankish and Suevi (II/72c)


Burgundi (II/70)


Saturday 3 December 2016

Battle of Auha, 291 AD

Game One
The Gepid army formed their line at the base of long difficult hill anchoring their left flank on the river. Due to the constricted nature of the terrain, the Tervingi formed deep columns requiring time to form their own battleline. Despite their laboring through the formation change, the Tervingi held the initiative and attacked.


Gepid sloth quickly dissipated as they easily countered every assault. The Gepid warband held well enough for the cavalry to cut down Tervingi warband. Score 5 – 1 for the Gepid.


Game Two
Taking advantage of the heights, the Tervingi formed their infantry along the hill crest with the cavalry extending the line from the base of the hill. The Gepid forming three columns would form a battleline beyond the wood.


Impatient at the progress made by the Gepid, the Tervingi proceeded down slope to take advantage of the disjointed formations.


First to strike the Gepid line were the Tervingi warband and within a short period the battle evolved into a number of isolated battles. Both allied contingents were engaged and earning their worth by adding to the Gepid casualty list.


Battle was fiercely fought, but the Tervingi persevered to win the battle with a score of 5 – 2.


Game Three
The placement of terrain is much what I had imagined for the actual battle. Gepid army on the left formed in three groups to face the Tervingi swarming over the difficult hill and cavalry positioned on the flat ground between the river and hill.


With contact made, the battle quickly became a brawl with warband columns pushing to and fro and cavalry followed a similar course. Flanks became exposed for brief moments only to become covered as warband moved forward.


A peal of war horns announced the death of the king bringing the battle to a quick end. With two casualties incurred earlier the game ended 4(g) – 0 win for the Tervingi.


Epilogue
Using the allied contingents did increase marginally the number of cavalry which should make mincemeat of the warband as these do not fight with their second rank. The number of casualties caused in this manner was relatively small. Of the 17 elements eliminated only 2 were mounted which equaled the number of Wb felled by knights.

Using allied contingents did lengthen the game, but this was not a critical issue. I wish to test this again but use no allied contingents. 

Friday 2 December 2016

A DBA 3.0 historical scenario - The Battle on the Auha 291 AD

While compiling research for an upcoming project and reading about the Goths, in particular the Tervingi, I stumbled on this little known engagement taken from Ablabius’ Origo Gothica. It describes a conflict between the Goths (Tervingi) and Gepid near the oppidium of Galtis in what is formerly Roman Dacia. The passage sketches the battle between two rival tribes and their allies battling for possession of the region.

The battle field is not described in detail other than it took place close to an oppidium situated near the Auha River. Players should therefore use Hilly terrain (two difficult hills) plus two woods and a river. Regarding the employment of the allied contingent both players are free to select which elements are to be replaced by the three allied elements. The Gepid player is the attacker, therefore the Tervingi player places terrain and moves first (this is based purely on the degree with which the Gepid are willing to fight having recently beaten the Burgundi).

Optional
Historically, the two rival groups fought a number of battles to claim the region formerly known as Dacia. Players may wish to play three battles using the same terrain items but exchange attacker/defender role and possibly deploy their standard army without allied contingents as a further option.

Tervingi (King Ostrogothica)  
1 x general (3Kn), 1 x noble (3Kn), 8 x warriors (4Wb), 2 x archers (Ps).
Taifali continent; 1 x general (3Kn), 1 x noble (3Kn), 1 x archer (Ps).

Gepid player (King Fastida)
1 x general (3Kn), 3 x cavalry (3Kn), 4 x spearmen (4Wb), 4 x archers (Ps).
Vandal contingent; 1 x general (3Kn), 2 x warriors (4Wb).

Sources
History of the Goths, Herwig Wolfram, University of California Press, Translation from the German edition.
Early Germanic Literature and Culture, Brian Murdoch, e-book, describes the Auha River serving as a border between the Goths and the Gepid.

From Dacia to Erdöelve: Transylvania in the Period of the Great Migrations by István Böna, places the Tervingi “on the fringes of Transylvania and the south-eastern Carpathians. Further battles were fought in the Szamos valley.