Tuesday 28 November 2023

Rome vs. the Nobades

During the second century AD, the Nobades migrated to the lands of Kush, eventually establishing the kingdom of Nobatia by the fourth century. During the period of expansion, trade flourished between the empire and Nobades, becoming a source of plunder for wandering tribes resulting in reprisal expeditions sent by Rome.  

Game one.

Rome found 
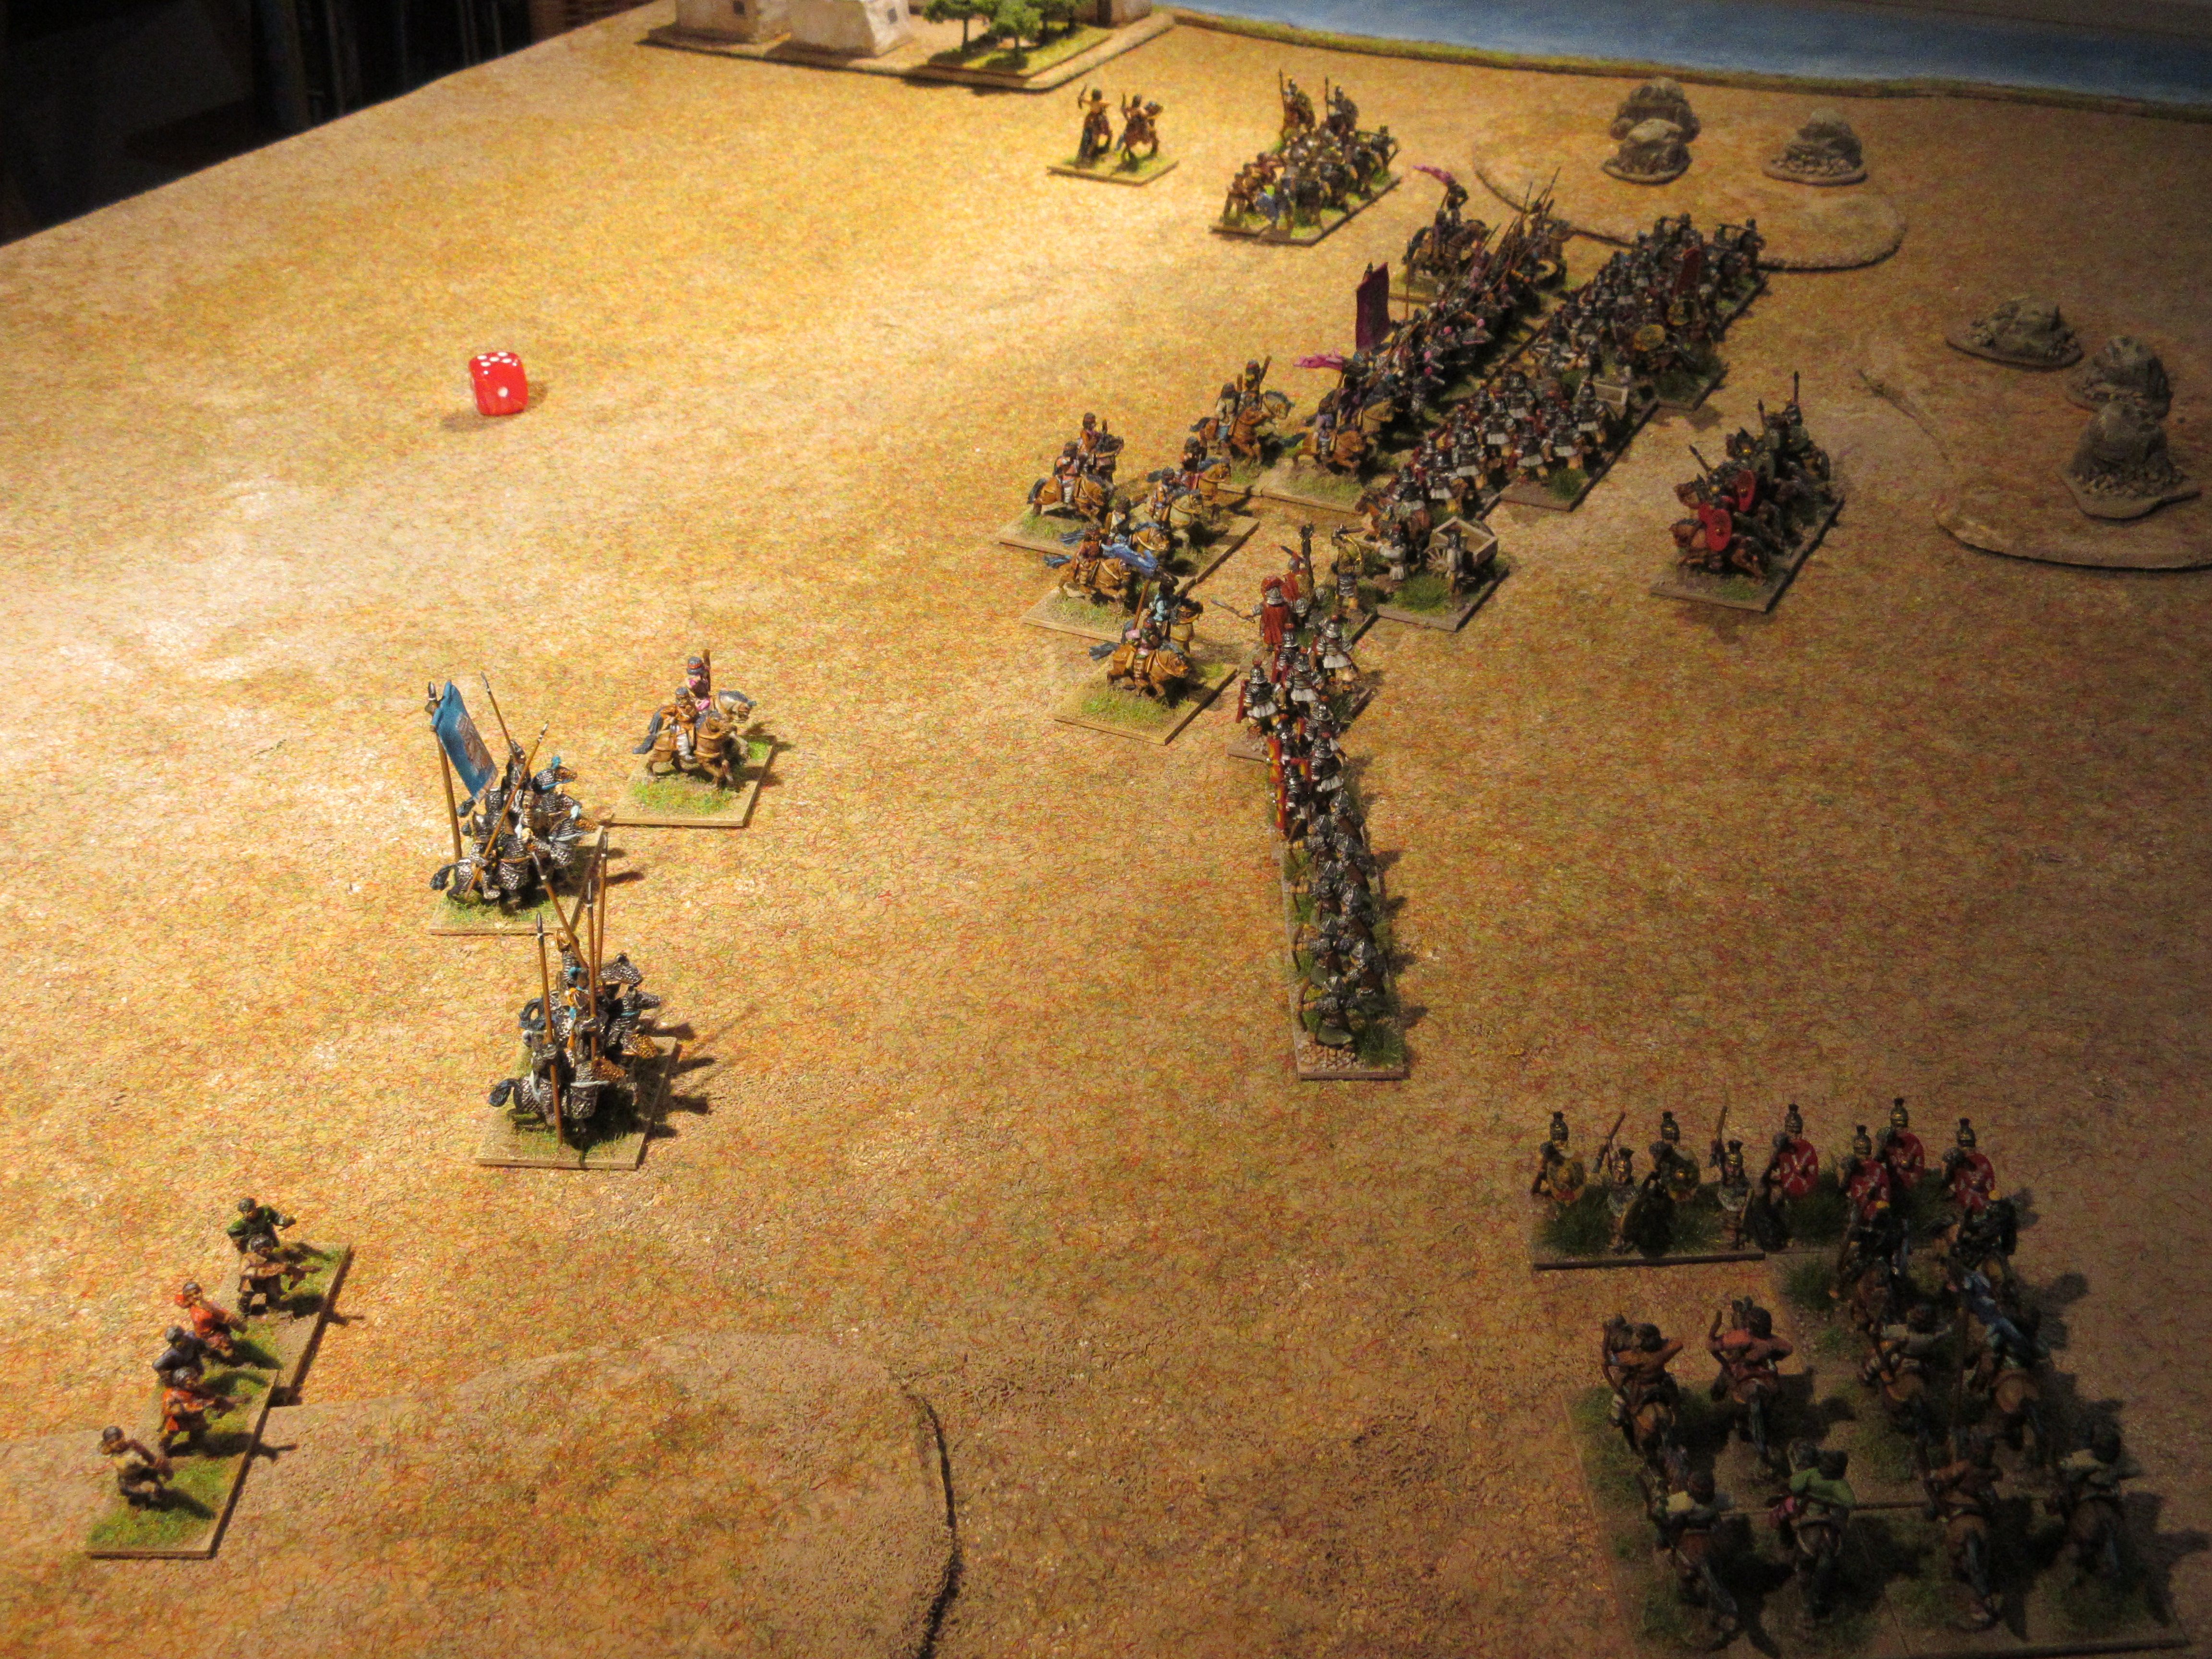
the Nobades deployed in line, their spear armed infantry in centre flanked by archers and behind the line, could be seen the cavalry and their general.

To confront the Nobades, Rome placed its legion in centre and deployed auxilia to deal with the archers. To deal with any flanking attempts, the cavalry and a few cohorts of legionnaires were positioned in reserve.

The legion advanced toward the enemy centre with the auxilia in support.

Soon, the clash of arms could be heard along the entire front. In the centre, the legionnaires and spearmen are evenly matched, but the flanks revealed a different story. Here, the Nobades gained the upper hand with the help of javelin armed warriors.

As both flanks gave way, Rome had no alternative but to withdraw from the field. The Nobades 8 – 4.


Game two 

A second engagement found the Nobades deployed in a similar manner, giving Rome an opportunity to revise its deployment and reinforce its right wing with all the cavalry.

The legion remained in position as the enemy line moved forward. On the Roman right, the battle developed in earnest with archers taking a position among the rocks to support the rapidly moving infantry and cavalry.

A hail of ballistae bolts fired at the approaching Nobade spearmen, effectively breaking their formation. On the Roman right, the combined assault by the auxilia and cavalry proved effective, inflicting many casualties.  

In centre, the Nobades gained some success, eliminating the ballistae, but seeing its flanks turned and Roman equites swarming in their rear, the battle was clearly lost. Rome 8 – 6


Observations.

The Meroitic Kushites were originally planned for the test series, but the Nobades seemed appropriate for the early period of the empire. The two lists differ slightly with the Nobades fielding more spearmen and javelinmen (3Ax), replacing the Kushite blade. The increased mobility for the infantry helped turn the battle in game one. 

In game two, Rome succeeded by overpowering the Nobades left wing and turn the tide of battle. This required all pip expenditure to be utilised toward developing a solid attack against the Nobades left while making small sacrifices elsewhere. Hard choices.

Sunday 26 November 2023

Late Roman Draco Standards

Building anew, a Late Roman army for the eastern front, presented me with an opportunity to order the remodelled legionnaires and auxilia offered by Old Glory. The difference is very nice; shields are larger and helmets have improved, though half an auxilia pack are bare-headed (German units?). Not every player will recognise shield patterns for legion (4Bd) and auxilia (4Ax); to solve the problem of identification I will add Draco standards to distinguish them and the elite cavalry units (4Kn/3Kn) from standard equites.

A dozen Draco standards were planned, four tor the cavalry and eight for the infantry. I have produced many Draco standards in the past, but this entailed a long process with constant correction with much trial and error.

A lesson learned, brass wire (.8 mm) was shaped to produce a wavy tail, small head and an ample foot piece for the standard to be glued to a base.

Milliput was applied to the ‘tail’ only and curled along its length. A moistened needle served to shape wings and spine. These were left overnight to harden.

Google, “Late Roman Draco Standards” and you will find examples of the Draco with an open mouth, eyes on either side above the mouth and on top, a comb. Done this way, completing the 12 standards took little time to complete and sculpting a head was easy.

The standards turned out well and will be undercoated later this evening. 

Thursday 16 November 2023

Rome invade Parthia

After Carrhae, relations between Rome and Parthia remained tense a century later. The rivalry to control and influence Armenia provoked a number of inconclusive campaigns. The campaign of 58 to 63 AD ended with Armenia demonstrating nominal allegiance to Rome, but ruled by a Parthian dynasty. This changed when Trajan invaded Armenia, annexing it as a Roman province and killing its Parthian ruler, Parthamasiris. Trajan further demonstrated Rome’s dominance of the region by invading Parthia to eventually capture the capital of Ctesiphon,

Our test matches take place during this period, with a confrontation occurring along the banks of the Euphrates bordered by an expanse of flat countryside dotted with rocky features. Both commands are of 24 elements with Parthia conscripting city militia and mercenaries to meet the Roman invaders.


Game one

Awaiting the arrival of Rome, Parthia placed its cataphract, forming two groups, and positioned its horse archers to both flanks.

Rome formed its battle line with the Euphrates River securing the right flank and positioned auxilia and cavalry on the exposed left.

Moving steadily forward, the Parthian cavalry and city militia marched against the smaller Roman line while horse archers encircled the open flank.

Militia archers could make little impression on the Roman line, Charging cataphract did break through, but breaches in the line were quickly filled by reserve units, stabilising the front.

Sensing the Parthian attack faltering, Rome counter attacked, catching exposed flanks and isolated units. The quickly mounting casualties forced the Parthian to withdraw from the field. A victory for Rome 9 – 5.


Game two

A subsequent battle, Parthia altered its deployment and gathered all its cataphract to create one powerful group.

To counter the threat, Rome deployed in a concave formation, with legionnaires, artillery, archers and equites at its base and the auxilia were placed at its tips, to deal with horse archers and militia archers.

As expected, the Parthian centre moved quickly against the Roman position to reduce the effectiveness of artillery and archer fire.

To Parthia’s dismay, Roman artillery and bowmen proved effective, necessitating time to redress its line before continuing the attack. Both Parthian flanks were now engaged with their separate battles with Rome giving little ground.

Despite the losses to its flanks, the Parthian cataphract struck home creating breaches in the Roman line.

The battle intensified as Parthian heavies surrounded the Roman general, reserve troops rushed to save their general and turned the situation around.

After the dust settled, Parthia had too few troops to renew its attack and had lost its general in the conflict. Assuming command, the Parthian subordinate-general called for a retreat. A second victory for Rome, 10 + Gen. – 5.


Observations

In game one, the Parthian assault on the Roman flank was countered by auxilia. One group of Parthian cataphract were shattered by effective fire of artillery and archers. The cataphract that did charge home could make little impression against the Roman line. Game over.

Game two, the concave deployment by Rome, forced Parthia to suffer the disruption of its flanks by Roman archers and artillery for an extra turn. The loss of the Parthian general in turn 3, could have turned critical for the Parthian, however, the sub-general was nearby to continue the battle.


Sunday 12 November 2023

Rome vs. the Ancient British

During the reign of Antoninus Pius, the frontier of Britannia was extended as far north to the Forth–Clyde isthmus. By the late 2nd century, the occupation of the Scottish Lowlands was interrupted when the Brigantes revolted. Lacking reinforcements, Governor Gnaeus Julius Verus moved troops south to suppress the revolt.

The Brigantes, in this test series, lack chariots which have been replaced with more warriors supported by light horse. The region is known for its steep hills and thick forests, giving the Brigantes an advantage, nonetheless, the governor had confidence in his generals.


Game one

The Brigantes are found defending a village near the foothills of a mountain range opening to a wide plain, suitable room for cavalry to maneuver. Rome positioned its two legions with auxiliary troops between and on each flank and on the open flank, the equites were posted opposite the enemy light horse.

Moving forward to reach the Roman battle line, skirmishers were seen sprinting to take a position on the hill flanking the Roman line. These were intercepted by Roman archers foiling their plans. Not long afterwards, the battle lines meet with neither side breaking despite the losses on both sides.

Battle lines locked, Rome sensed the Brigantes were losing momentum and signalled the cavalry to launch their planned attack. This tipped the scales putting the Brigantes to flight. Roman casualties fell heaviest on the legion, but the Brigantes lost twice as many, Rome 9 – 5 + sub-general.


Game two

Anticipating a similar tactic from the Brigantes, Rome revised its deployment to meet the barbarian rush by forming the infantry in two lines of equal number and the cavalry secured the open flank.

Amassing the majority of its warriors in the centre, the remainder would attempt to infiltrate the wood and village to roll up the Roman right. Brigante light horse were positioned opposite the Roman cavalry.

Reaching the village, the Brigantes found it occupied by auxiliaries and quickly set upon them and at that moment, the main body struck the Roman right centre.

The fight for the village became hotly contested, neither side giving ground and nearby, the main battle developed, but each breakthrough by the Brigantes was quickly met by reserves from the Roman second line.

The tenacious resistance in the village, scuppered Brigante plans, but the fighting in the centre became critical necessitating the general join the battle with his bodyguard. While doing so, the cavalry was given the signal to make their charge. Routing the Brigante light horse led to a general retreat of the Brigante army. Rome victorious, 9 + sub-general – 4.    


Observations

Both sides lost a sub-general in each game, but this was not as catastrophic as it could have been. Both generals were positioned in the centre of their respective lines and able to continue control over their troops.


A re-match is certainly on the cards, next time the terrain should have more woods and a river.

Tuesday 7 November 2023

Rome vs. the Marcomanni

During the reign of Emperor Augustus, the Marcomanni become a dangerous threat and plans eliminate the kingdom of Maroboduus were made. The campaign would commence with Tiberius leading 12 legions across the Rhine, unfortunately, the Illyrian revolt postponed those plans.

Good fortune however, presented itself when war broke out between Arminius, the victor of Teutoburg Wald and Maroboduus in 17 AD, forcing the latter to withdraw to Bohemia. The long period of peace that followed ended when the Marcomanni, together with the Quadi and Sarmatae tribes crossed the Danube in early 160 AD, initiating a 14-year long conflict.

The wars of the Marcomanni are represented as two sub-lists in the DBA3 rulebook; an early period one, ruled by Maroboduus and a second one with Ballomar as king. This test series, the Marcomanni use the first sub-list as it offers ‘warriors trained in the Roman fashion’ or 4Bd, making the Marcomanni a formidable opponent.


Game one

The battle took place on open ground between forest and thick scrub, offering sufficient room for the infantry to deploy, the cavalry however, took a position beyond the scrub essentially creating a separate battle.

The Marcomanni began the battle and approached the Roman line at a steady pace. The legion remained in place while beyond the scrub, the Roman equites launched their attack against the German cavalry. The scrub separating the two conflicts quickly became a pivotal location as this became ideal cover for Roman auxilia.

Accompanying the auxilia was a cohort of archers and from their position, began harassing the rear of the barbarian columns.

At the Roman centre, the artillery discharged a hail of bolts disordering a number of columns. Those columns that did reach the Roman line were able to force a breach. These were quickly filled by units held in reserve.

Sensing the Marcomanni assault had reached its high-water mark, four auxilia moved out of the cover of scrub to assault the Marcomanni centre. Adding to the pressure, the Roman equites overpowered the opposing German cavalry. Sensing victory was no longer possible, the Marcomanni warlord called for a retreat; Rome victorious, 10 – 4.


Game two

Gaining valuable insight from the first engagement, the Marcomanni made changes its deployment. The Roman deployment remained unchanged.

The Marcomanni horde advanced and on its flanks could be seen the disciplined ranks of the trained infantry (4Bd). At their centre and in the first rank was their leader.

As the two lines collided, the Marcomanni cavalry began its encirclement of the Roman line. The flank attempt was stopped by the auxilia infantry and equites defending the Roman left.

The battle raged on in the centre, casualties falling on both sides and Rome quickly filled the breaches with units held in reserve.  

With severe losses incurred on both sides; the battle lines disappeared to evolve in many isolated conflicts. Both sides smelled imminent victory as the score reached break point, 8 – 8.

Quick off the mark, the Marcomanni cavalry, led by their sub-general, launched a desperate attack, breaking the Roman equites and secure a narrow victory. The Marcomanni 10 – 8. 


Observations

The first battle developed as per text book; adequate reserves, a strong cavalry wing matched by a strong wing of auxilia positioned on the opposite flank. The artillery performed well, disordering the barbarian phalanx, forcing them to make piecemeal attacks. 

However, the second battle was truly a slugging match (8 turns) and progressed throughout with both sides levelling the score each turn. Both sides reached break point on the same bound (turn 7), but the Marcomanni were blessed with pip score of 6, making an end to a long hard battle.    

Thursday 2 November 2023

Upping the ante

In April of this year, a series of test games were done, bringing a newly completed Early Imperial Roman army against a number of enemies as listed in DBA3. As the months progressed, the number of enemies increased to reach a total of 15. The standard 12 elements were used with each match played twice. A summary of each battle with photos was posted to the blog and any unusual aspects are also noted. The series ended with a better than average score which brings me to the next phase – upping the ante. 

Three years ago, we enlarged the single command to 24 elements and discovered an enjoyable game. There was a marginal increase in game time; 30 minutes to 45 or 50 minutes, but this was acceptable. Examples can be found by clicking of the link labelled “Index” on right. 

Of the 15, now increased to 16 enemy, a similar test series will be played using the larger command of 24 elements. This will involve only 10 opponents as these have two commands. This will be interesting if Rome can exceed its current win ratio. Enemy in Red have two commands.


Rome    1          Alemanni         1

Rome    2          Marcomanni     0

Rome    1          Dacia               1

Rome    1          Sarmatae        1

Rome    1          Batavi             1

Rome    1          Kushites          1

Rome    2          Nabataea         0

Rome    1          Edessa             1

Rome    1          Parthia             1

Rome    1          Commagene     1

Rome    2          Late Judaean   0

Rome    1          Later Moors     1

Rome    1          Alani                1

Rome    1          Nomad Arab    1

Rome    1          Ancient Brits   1 

Total               Total   

Rome    18        Enemies            12 

The Jewish Revolt have recently been added to the list.