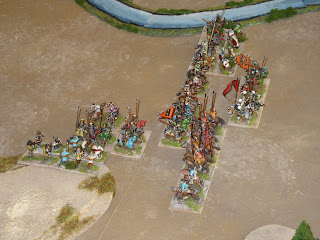
Wednesday 26 April 2017

Historical Match - Sassanid vs. Armenia

Continuing his campaigns in the northern provinces, Ardashir I marched his army for one final campaign against the remaining members of the Arsacid dynasty now in Armenia. The Armenian army of this period have heavily armoured cavalry supported by a large number of light horse. Armenian javelinmen are ideally suited for operations in rough ground and hilly country and having the advantage of ‘home’ terrain will not be an easy opponent for the Sassanid.

II/69a Sassanid vs. II/28b Other Armenian

Terrain:
Hilly with two difficult hills, two wood and river.

Game 1
The open expanse between two difficult hills with a river flowing between sliced a large area of battlefield. This posed a problem for the mobile Sassanid who would now be forced to manoeuvre in deeper formations.   The Armenian anticipated this and would use its mountain troops to seize the key hill to outflank the Persians.


The main force of Armenia moved slowly forward to allow time for its infantry to take a flanking position. This precipitated an all out attack by the Sassanid.


In the following bounds, Ardashir and other nobles broke through the Armenian line while enemy infantry were getting the better of their fight with the Asavaran horse. The score was even 3 – 3.


 On the next Sassanid bound another cavalry unit succumbed to the infantry (4 - 3) but the bound had not yet played out. Credit goes to Ardashir killing the Armenian king bring the score 5g – 4 for Sassan.


Game 2
The second battle was fought in the ‘next’ valley. Armenia would pursue a similar tactic of winning suitable ground for the infantry to work their wonder.


A pip score of six raised their spirits and Armenian infantry seized both wood while the main body closed the distance between the two armies.


The Sassanid were blessed with an equally high score and threw everything at the enemy including the ‘baking oven’. This resulted in five combats resulting in four Armenian units destroyed. Score 4 – 0 for Sassan.


This was truly on of the most bizarre engagements of all the matches to date lasting all of eight minutes.


Game 3
This final engagement brought both sides to an open field nestled between difficult hills and a river. Due to the constricted terrain Ardashir and his nobles formed the vanguard hoping to lure the Armenian so as to make use of his Asavaran cavalry. The majority of the light horse were sent to out flank the Armenian position and draw off their reserves.


Seeing the mass of Sassanid horse archers, the sole Armenian light horse scampered back to cross the river. Likewise, two infantry were despatched to secure impede any crossing giving the main body time to develop its assault. Armenian javelinmen were successful securing the second hill.


The Armenian light horse turned to face it pursuers as reinforcements were fast approaching. The main battle was well underway with both sides taking losses.


The Armenian King valiantly fought off repeated attacks despite the loss of supporting units. Quickly surrounded, the king perished with his bodyguard leaving Ardashir I the victor. Score 4g – 3 for Sassan.


Saturday 22 April 2017

Historical Matches - Sassan vs. Parthia

In this series there are several all cavalry battles. Of these the Parthians field three cataphract elements and nine light horse giving them an equal number of knight class troops and nearly double the number of light horse. Only the Asavaran cavalry might prove troublesome.

II/69a Sassanid vs. II/37 Parthia.

Terrain:
Arable which included two gentle hills and two fields.


Game 1
Parthia as defender deploys between a low hill and the corn fields and facing them in an extended line are the Sassanid with their heavy cavalry deployed in centre with near even number of light horse on both flanks.


Taking care not to lose their alignment, the Parthians advance. The Sassanid launch both flanks first with the centre formation moving slowly forward.


In two turns the Sassanid have destroyed the entire Parthian right and ruptured enough of the left to send the enemy army in flight. Score 0 – 4 for Sassan.


Game 2
In this battle, the Parthians found themselves in similar terrain but this time kept made good use of a low hill whereas the Sassanid formed up in the same manner as before (three divisions).


The Parthians, thirsting for revenge noted the reluctance of the Sassanid to advance and by the second turn struck first sending a number of Sassanid units back on their heels. By the following turn, the score was even at 2 – 2.


Seeing the prowess of their King, the Sassanid redoubled their effort sending the Parthian leader off the field and with that, the rest of the army fled off the field. Score 3 – 4g for Sassan.


Game 3
The final battle was fought in a clearing of less than 800 paces between corn fields and low hills which would quickly become a killing ground.


In the thick of action, this time it was Ardashir who was sent off the field. Despite the loss of their commander, the Sassanid were resilient in bringing the battle to an even 4 – 4 score.


Unfortunately, the next turn brought a tie breaker and a victory for Parthia. Score 4 – 5g for Parthia.


Tuesday 18 April 2017

Historical Matches - Sassanid vs. Nomad Arab.

Historically, the Sassanid did deal with a number of Arab tribes that supported Parthia. For this series I selected the Camel mounted troops and not the blade option. There are two elements of blade supported by two of bow and these should be sufficient to hold off cavalry, but camel mounted will destroy knights on a recoil outcome which should keep the Sassanid on their toes.

II/69a Sassanid vs. II/23a Nomadic Arab  

Terrain:
Dry terrain which included two difficult hills, two rough ground and a dune.


Game 1
The Sassanid deployment avoided the rough ground and dunes by forming up to the right of these. The difficult hill ahead would certainly be filled with archers so a plan was devised to ‘pull’ the Nomad centre away from their supporting archers.


The Nomads had anticipated this and anchored their left flank and wheeled their line to face the Sassanid attack. The Nomads were able to counter the Sassanid effort moving around the hill but were less successful on the right.


The area between the hill and rough ground became a slaughter house with both commanders joining the battle. Despite the advantage of numbers the Sassanid were able to turn the battle in their favour. Score 2 – 4 for Sassan.


Game 2
For the second battle the Sassanid changed their deployment and formed two groups in place of the usual three as this would bring the light horse in close support of the heavy cavalry. The Nomad adjusted their own deployment by placing all their camel mounted troops on the left while the infantry would make good use of the rocky ground and hill.


Nomad skirmishers quickly seized a flanking position on the slopes threatening the Sassanid light horse. Nomad light horse moved in support to attack on the following turn. Elsewhere, signals were mixed (low pip score) and the Sassanid advance did not move as planned.


When the Sassanid attack on the right was finally delivered the Nomad infantry had steadily advanced to cut gaps in the left wing with their effective archery. With no means to turn the tide, Ardashir called a general retreat. Score 2 – 4 for Nomad Arabs.


Game 3
In the final battle the Sassanid were fortunate to deny the Nomad use of the favourable terrain. The Nomads did anchor their left on the rough ground, but their right was fully exposed on the open plain. To remedy this, a reserve of light horse and camel scouts formed a second line.


This time the Sassanid effort between wings and centre was better coordinated. On the left, the majority of light horse was able to flank the Nomad position drawing the reserve units away from the main battle. The Asavaran were able to contend with the camel mounted Nomad while the nobles led by Ardashir broke up the Nomad centre. Score 3 – 5 for Sassan.


Saturday 15 April 2017

Historical Matches - the Sassanid vs. Adiabene

This new series will match the Sassanid sub-lists versus each of their enemies. Some matches will have been done earlier, but there are always new cunning plans and ideas for terrain placement that need experimenting.

Sassanid sub-list ‘a’ represents the revolt led by Ardashir I and his initial conquests deposing first the Parthian overlord in the west, then marching north to subdue a number of realms, clash briefly with Rome before ending his first major campaign in Armenia.

The Adiabene were a number of city states supported Parthia during the final years. Their strength lay with a goodly number of archers supported by blade and javelinmen while the mounted troops are a mix of cataphract, horse archers and caravan guard.

II/69a Sassanid vs. II/22e Adiabene 

Terrain:
Hilly which included two difficult hills and two rough ground.

Game 1
Difficult hills cover one side of the battlefield leaving perfect cavalry ground for this battle. The Sassanid formed up in their standard formation of heavies in the centre with horse archers extending both flanks. Having fewer cavalry, the Adiabene make use of the rough ground and difficult hills to deploy their foot troops in and what light horse are available, these deploy to the open flank.


The Sassanid seized the initiative to switch their effort and envelop the open flank while the remainder of the cavalry move slowly forward. Adiabene infantry now hold both hills with archers and skirmishers and are making their presence felt.


The Adiabene archers cause no casualties but do send cavalry formations back. To compensate for the increase range, the Adiabene line moves slowly forward while firing their bows. The Sassanid effort on the left flank proved effective and soon they will sweep down on the Adiabene right flank.


Losing the right flank and more troops from the centre, the Adiabene commander signalled for a general retreat. Score 2 – 5 for Sassan.


Game 2
The Sassanid was fortunate to catch the Adiabene forces in the open as the terrain to their rear would have been a nightmare for a cavalry force to fight in.


At the outset of the battle, the Sassanid placed their main effort on both flanks and refuse the centre. This left the Adiabene no option but to close the distance if they were to benefit from their archery advantage.


The tactic worked well as the Sassanid right flank were now free to roll up the open left flank of the Adiabene infantry and help score a second victory. Score 2 – 5 for Sassan.


Game 3
For the third battle, the relative positions were nearly the same, that is the Adiabene army were again caught in the open , however, the Sassanid were slightly inconvenienced by the rough ground and hills.


 The Sassanid modified their battle plan to concentrate their effort on their right flank and entice the Adiabene army forward in the same manner as the previous engagement.


This time the Adiabene archers improved their skills and were rapidly cutting down troops and joining in close combat against the Sassanid. The emboldened Adiabene were quickly the masters of the field. Score 4 – 1 for Adiabene.


Monday 10 April 2017

Difficult Hills – completed project.

The mountain tops are painted in two styles, one for greener areas and the second for dry regions. Adding trees to the hilltops would be the final step and for these I purchased a bag of fir trees from my local supplier. The twenty pieces varied in scale such that half were not really usable (11cm) and there were not enough of the smaller types to use.


The problem was solved by clipping the tops off the larger trees as seen in the second photo. The ‘trunk’ was simply the wire centre and bristles tightly rolled up. The lower piece was re-shaped and will be based with others for my ‘forests’.


As you will note from the previous photo, the fir trees have a shiny dark green colour. This was changed to a light green shade by brushing white glue on the bristle tips and dipping the tree in a bag of Woodland Scenic turf (light green). The trees are glued to the mountain tops and I applied sparingly some electrostatic grass to add contrast.


 Investigating photos of ‘arid’ landscapes actually showed very little vegetation so I sprinkled some electrostatic grass to finish the pieces. The hill pieces were done a year ago and I had not realised my colour preference for flocking had change, so that will need some attention to bring consistency to the feature.


Next project is a new DBA game mat.


Thursday 6 April 2017

Difficult Hills

At the moment I am refurbishing a number of collections to bring them up to a current standard and with the large number of historical games much of my terrain collection is experiencing the same process. Difficult hills are currently progressing through a third generation;

...from a ‘layer cake’ style,


...to a sculpted style.


 Since DBA 3.0 I have discovered the effectiveness of medium and smaller terrain features over the larger pieces; fields (plough) and hamlet (BUA) are now 2BW x 3BW on average or slightly larger.

Regarding hills, I found it expedient to leave the larger pieces in their boxes and used the smaller low hills and add ‘rock’ to symbolise these as difficult. This worked fine until we started using armies that could use both difficult hills and rough ground. This hit a snag as there was not enough of the rock scatter material for both terrain features. Hence the third and hopefully last generation of hill type.  

The symbolic pieces are now larger which will nicely define the type of hill. The pieces will be finished as two types to serve in arid climes and the greener zones of Europe. A few small scale trees will be fixed to the pieces to avoid a bald rock feature.


These should be finished this weekend and ready for use in our next games.