Friday, 18 October 2013

Castle Building – the courtyard

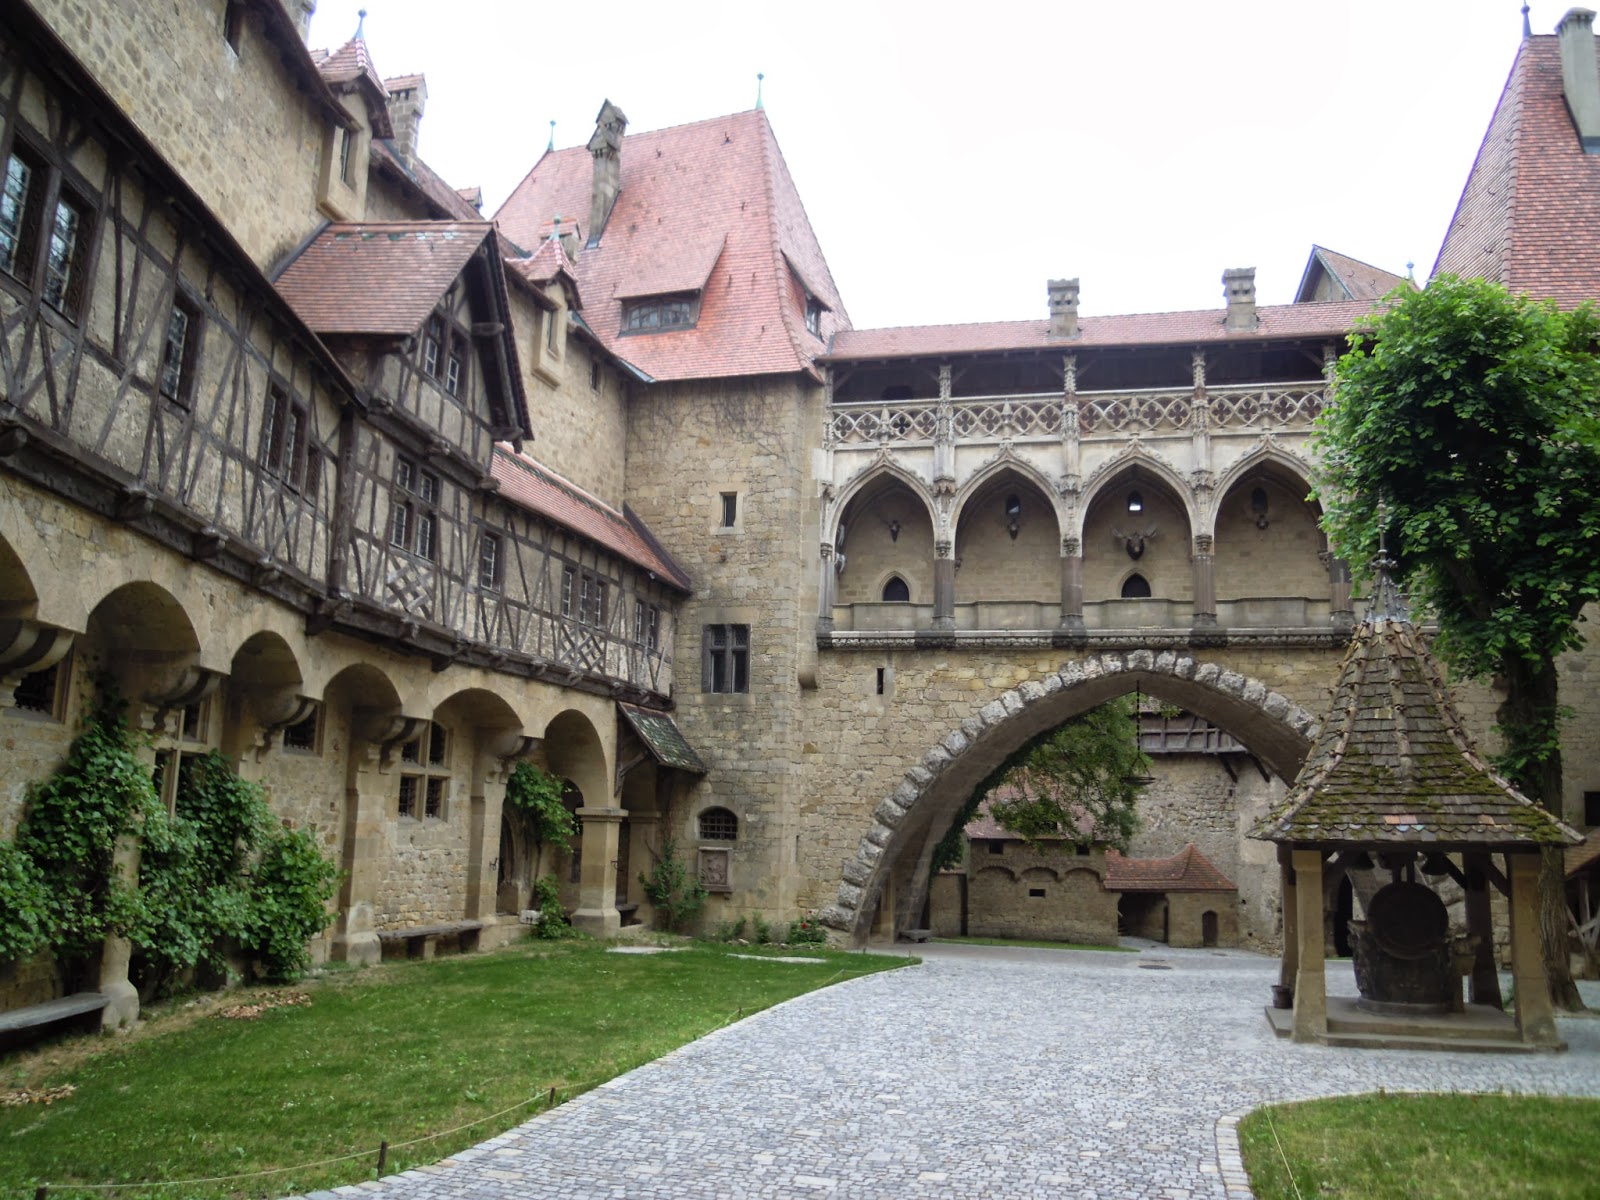
This photo typifies the interior of the castles shown earlier, certainly not late medieval castle but gives an idea of the sloping ground, stone finish and arches that need to be constructed. At ground level are areas for storage of food stocks, a carriage or two, stables, kitchen, servant and castle guard quarters and the upper levels, the noble’s apartments and great hall.


The courtyard should be able to hold a double sized element of foot (40 x 40 mm). I have a number of these among the Italian, Swiss and Mercenary commands. The courtyard will be elevated perhaps 10 mm so the arcade, stairways and balcony should allow for the change in elevation.


Archways, doors and a staircase are added and a stone finish seen here will also cover the exterior walls. The blocks will need further trimming so as to able to form up around the perimeter of the courtyard. I have done that with the two sections next to the right of the gatehouse. 

The two pieces in the foreground will be the raised courtyard. This will need to be trimmed and graded to meet the gatehouse. I see now the end result will not be 40 mm square but will certainly accommodate majority of other elements. 

Further, embrasures will need to be added to the tower and I just may add a second,but smaller tower to flank the main hall. 

Next, the "shape of things to come". 

Cheers, 

Thursday, 17 October 2013

Castle Building – exterior surface

Today, I want to focus on the exterior of the castle. From the selected castles I used as references, much of the exterior has been converted to accommodate changing taste over the past five or six centuries. Gone are the embrasures, crenelated walls and arrow slits. These I shall sketch and cut out from the individual sections.  

With the castle keep and tower at its highest point and the gatehouse at the lower end of the perimeter. I will need to lower the gatehouse by 5 – 10 mm and add that much to the structures at the rear.

That step completed, the embrasures now need to be added to the exterior surface. This is easily done by trimming a few millimeters from the wall and ending about 5 mm from the lower roof edge. Indentations can be made with a sharp tool or pencil point. 

At this moment no structures are fixed to allow freedom of composition. 


Note, the castle base has been trimmed back. This is fine, as I will add rock formations around the base with the cuttings saved from step one. These will be added as a final step before undercoating. 

But next, the interior.

Cheers, 

Castle Building – bringing shape

At this point I want to compare the proposed work with past structures as these may be used together for special scenarios. In the photo are finished pieces with the “castle” poised on a possible setting to compare height and size.


I do want a courtyard with sufficient space for an element and possibly elevated to allow easy access to the figures (walls with roof are nearly 60 mm high). Further visualizing the blocks as barracks, great hall and other enclosures, these need not be very deep or thick, so trimming these will help create enough interior space.

Taking an extra block, I cut this in half to build a roof. Angling my cuts, this produced a solid roof piece and two half sections, when glued together will serve as a second roof.

From the next photo, the loose pieces are now placed atop the hill in no particular order as I just want an impression. The tower has an extra section added to give height, but looking at the overall effort, this could be raised another 10 mm.


Looking back at the reference photos, the buildings should vary in height to give an impression of this sitting on a mountain top. That is for the next stage, securing its final form.


Cheers, 

Wednesday, 16 October 2013

Castle building, a start.

The material used is the same pink foam I have used for all by building projects. The sheet is 40 mm thick, quite easy to cut, rasp or score, will take standard household paint nicely.

The template I use is laid in a grid pattern (base width) for the maximum allowable size terrain feature for DBA. For hills, woods, fields I prefer a larger piece either 3 BW x 6 BW or 4 BW x 5 BW. This castle like the fort I built will fit a smaller area of 3 x 3 to allow placement on a hill.


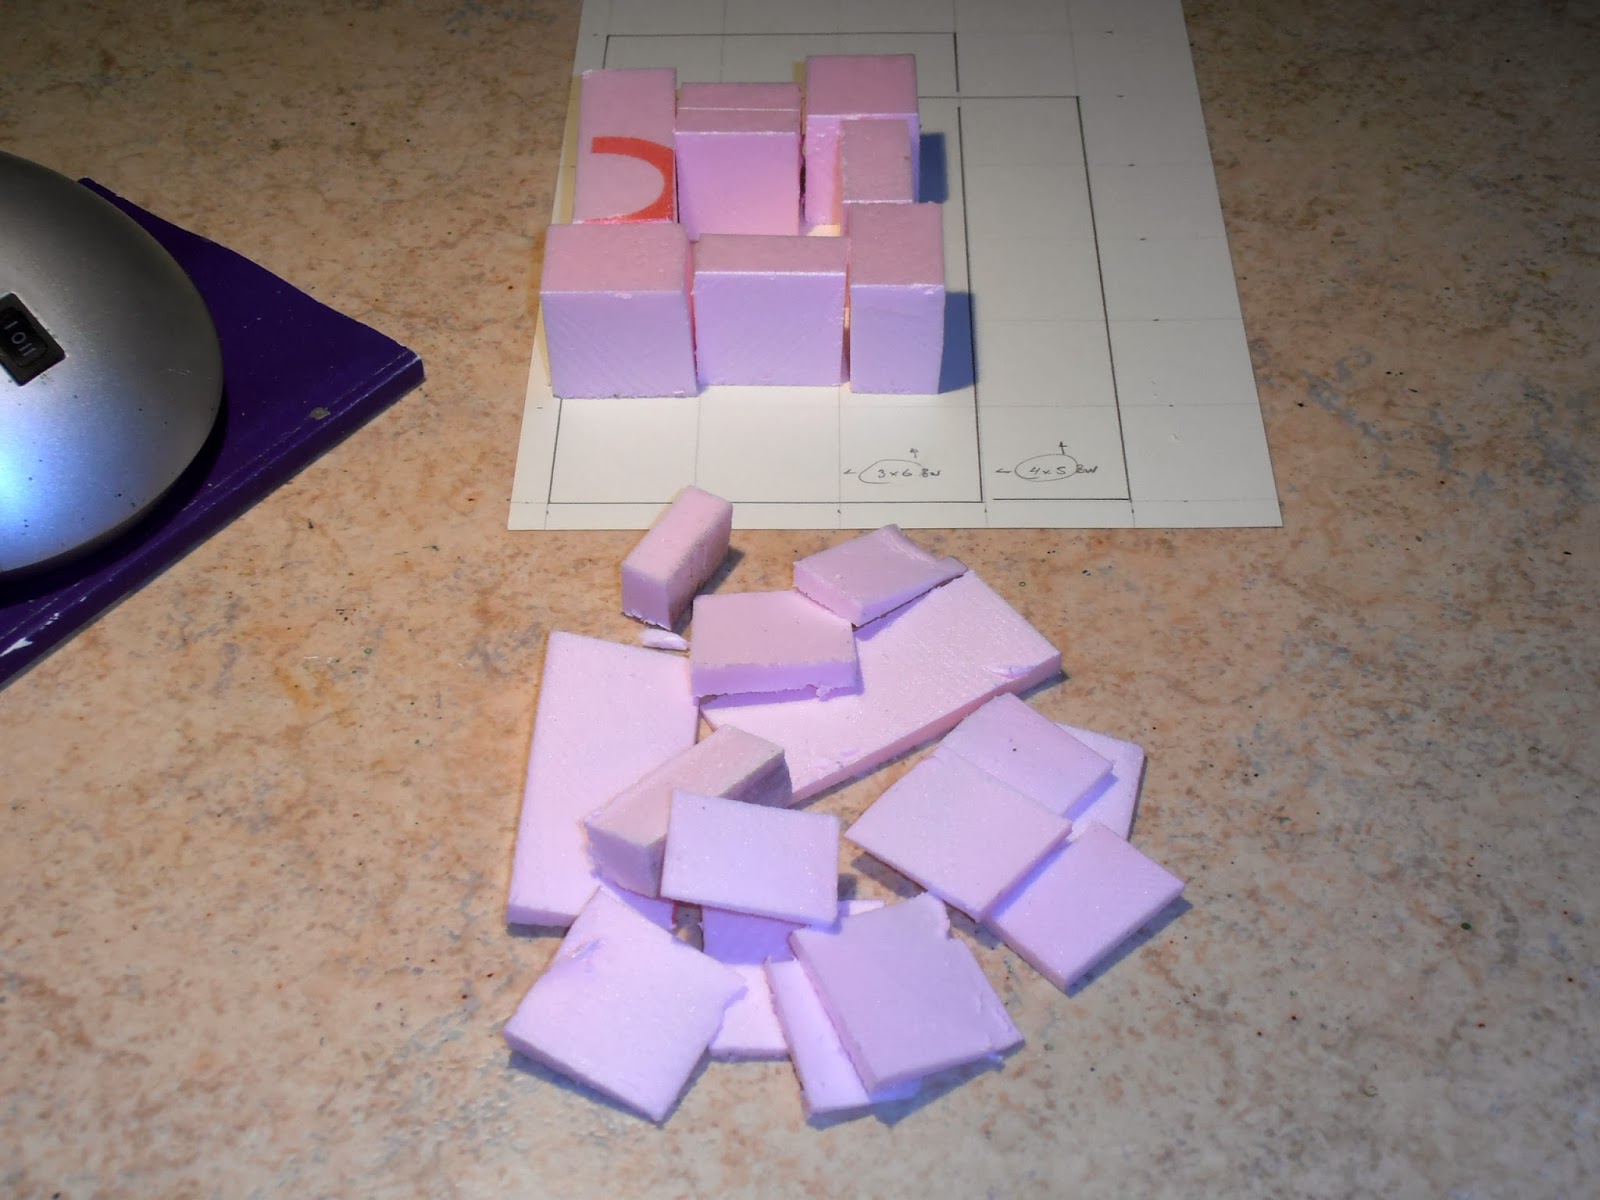
First step is to cut sections out. I am not worried about dimensions as these blocks will be trimmed down to allow an interior opening for an element. As you will note from the photos, the structures did vary in height and this model will copy that. The tallest fixture, the tower, should not be more than twice the average height of the model, less it be knocked over during a game.


At this point, all cutting is done with a simple bread knife. Score the surface first before making your cutting strokes. In the last photo, all blocks are nice trimmed and squared off. The shavings are saved as these will be useful later.


Next, giving shape to the blocks. 

Cheers, 

Tuesday, 15 October 2013

Building a Medieval Castle

Since my last post I have immersed myself with another project, Rome of the Severan Dynasty and her enemies. If you wish to follow the course of the armies, you will find the thread here at Fanaticus.

After constructing a cavalry fort set for the eastern frontier a request came for a tutorial. That was not a problem as I had a small castle or fortified manor on my list of projects and that brings me back here.

The soon to be published DBA 3.0 allows four category of BUA of which one is a “Fort or Castle”. The dimensions for all BUA are specified, so it is up to the player to purchase or construct these pieces. As I enjoy building my own, I prefer my structures to be slightly smaller than the 15 mm scale I game with.  

Selecting a reference

The armies for Storm Within the Empire began in Bavaria and later expanded to include Austria, Hungary, the Swiss, Trento and finally the Ottomans. While traveling through Austria I became fascinated with castles there and so set my construction project to reflect that area. 

Some examples:

From the blog Medieval Hungary is Lochenhaus, actually in Austria.


From the blog The World's 10 Scariest Haunted Castles, Moosham Castle, Austria.


Another.


You will note, the castles are set atop a mountain with a single approach leading to a gate house. The high walls protect a Keep, one or two high towers and a few two or three story structures housing all the necessary to make life comfortable. 

Next, the material, tools and a start.
Cheers, 

Sunday, 14 July 2013

Prelude to Rovine (1395)

Previous tests of 3.0 have involved nothing more than single commands which gave little opportunity to test LH rear support. Using the big battle option perhaps those chances would be increased.

A breakdown of commands.
Hungarian left flank, 10 elements, Hungarian Central command 14 elements and Wallachians, 12 elements.

The Ottoman Central command had 15 elements, near right 8 elements and far right 13 elements.

Photo one show the terrain from the Wallachian and Hungarian perspective. To negate the superior numbers of Ottoman cavalry, the allies would rest both flanks on the woods. The ground between would be covered by infantry supported by Hungarian knights and Wallachian Boyars. The allied left flank found the remaining Hungarian knights and Cuman cavalry supported by skirmishers.


Faced with an allied army situated between two woods, the Ottomans would place the central command with all the infantry about the hamlet and fields and cavalry in reserve. The remaining two commands of Ottoman cavalry, Serbian knights and Akinjis would dedicate their efforts to rolling up the Hungarian left flank.

Photo two shows the position of Hungarian and Ottoman deployment.


Bound one: Both sides now followed their general strategy during the opening move. The Ottomans took advantage of good dice to advance their Akinjis beyond the woods (Photo three).


Bound two, saw the allied infantry move forward. The Wallachians with their less impeded infantry advanced further giving the overall Hungarian Wallachian battle line an oblique appearance. In response, the Ottoman central command extended their left and exchanged volleys with the Wallachian archers. With excellent die rolls, the Akinjis were able to negotiate the woods and deploy on the exposed Hungarian flank. The smaller Ottoman command struck the infantry line bringing down two Crossbow elements.

Bound three, the Wallachians reformed their bowmen to launch a devastating volley which evened the tally. Infantry spear seeing their crossbow cut down fell on the Akinjis front and flank to give the allies their first lead. Undeterred with poor pip throws, the Ottomans were able to close combat; the Akinjis on the extreme right flank closed with the Hungarian skirmishers and the remainder of the Ottoman cavalry charged the Cuman light horse pushing them back. 5 – 3 for Ottomans.


Bound four, the Hungarian left under extreme pressure from Ottoman cavalry, Serbian knights and Akinjis were attempting patch work measures. Knights and Cuman light horse were dispatched to deal with the Akinjis encirclement. To help bolster the recoiling Cuman lights, the General and guard through themselves into the fight. The Hungarian infantry reformed and surged forward creating maneuver room for supporting Hungarian knights and Cuman horse. The Wallachians redressed their line and with concerted effort eliminated the last of the Ottoman bowmen. Despite the loose of the Serbian knights, the Ottomans held their lead. 6 – 5.


Fortuna smiled again for the Ottomans a supplied better than average pip scores. The Ottoman cavalry and Serbian knights formed line under the central command; Ottoman skirmishers were readied to support a cavalry charge against the Hungarian and Wallachian infantry line. Further to the right, the smaller command occupied the spearmen denuding the main infantry line of their support. Ottoman Sipahi opened a gap further by pushing back Cuman light horse. On the extreme left, the Akinjis cut the last of the Hungarian skirmishers down. The ploughed fields to their left were soaked with the bodies of more Cuman lights while both Generals were desperately fighting in close proximity of one another. Among the furrows of ploughed earth one stallion stumbled bringing its rider down and Sipahi ax and mace finished off the Hungarian wing commander. 9 – 5 for the Ottoman and one Hungarian command demoralized.


Bound five, found the central Hungarian command forming a cavalry line in anticipation of an Ottoman assault from that sector. The Hungarian left, although demoralized might still delay the expected assault. The Wallachians discomforted by the news on the far left could bring no effect with their archery.

Smelling victory nearby, the Ottomans assailed the Hungarian and Wallachian line with all three commands. On the far right, the slaughter continued unabated while the smaller Ottoman command fenced with the Hungarian spearmen, managing to have them recoil. Charging across the fields, the Sipahi and Serbian knights, this brought the Ottoman CinC to a near death experience and delivered the first Wallachian casualties.
Score 14 – 5 for the Ottomans.


Bound six and to the finish line. Good pip throws, however, with few reserves the Hungarians and Wallachians could do little. The Ottoman central command was two elements short of becoming crippled. Refusing to rout off the field, the Hungarians of the far left remained defiant. The central command redressed their line. The spearmen were able to push back the Ottoman cavalry. Further, Hungarian blade made red the fields with Sipahi corpses. Triumph was only one element away.

Assessment
Up to now all my games with the Ottomans were with single commands. This match was a departure. Having more space to maneuver, the LH rear support proved very useful, not so much for killing the opposition outright but bringing about timely recoil.
The game flowed nicely as there were no more delayed moments making intricate maneuvers or flank charges. It has taken me longer to write up the report than playing the actual game.

Ah yes, the victor. Both Hungarian blades were in the thick of it. One wielding death and destruction on the Sipahi bringing the Ottoman central command one element away from demoralization. The irony came with the second Hungarian blade falling to the Sipahi next in line to demoralize the Hungarian central command and game won.

Ottoman 5 – Hungarian 16. 


Cheers,

Wednesday, 10 July 2013

Wallachia – completed


Actually, the Wallachian command were painted and based late last year, however one final touch remained lacking, the headgear. 

The figures came from the Ottoman list of Legio Heroica. Beautiful figures but they lacked the proper headgear to be proper Wallachians. Today, I added Cuman styled caps and fur head pieces to complete the Wallachian cavalry and infantry plus Cuman light horse for the Hungarians.

Photo one show the Wallachian figures (foreground) completed late last year. Most have peasant style caps and cavalry, a fez or no headgear at all.


Illustration two was sent to me by a Fanatici (Jiri) from Switzerland which I used as a guide.


Photo three shows the number treated with Milliput and photo four are the completed Wallachian. In the background are the Cuman cavalry of the Late Hungarian army.


Now complete, the Wallachian and Late Hungarian armies are ready to battle the Ottomans. Next post, a big battle engagement using DBA 3.0

Cheers, .