Tuesday 26 December 2023

Rome vs. The Iazyges

The Iazyges became one of many new client-tribes of Rome during the reign of Tiberius, but details of their service and rewards are vague. Despite their status as a client state, tribes among the Iazyges conducted raids across the border into the empire. The situation soon escalated when the Iazyges, together with the Roxolani, Dacians, and Suebi invaded the Roman province of Pannonia in early 92 AD. Events are muddled, but highlight the victories of Domitian, but gloss over the annihilation of the Roman Legio XXI Rapax in battle. Much later, the Iazyges were again, during the Marcomannic War of 169, in conflict with Rome. but were soundly defeated by Marcus Aurelius. 

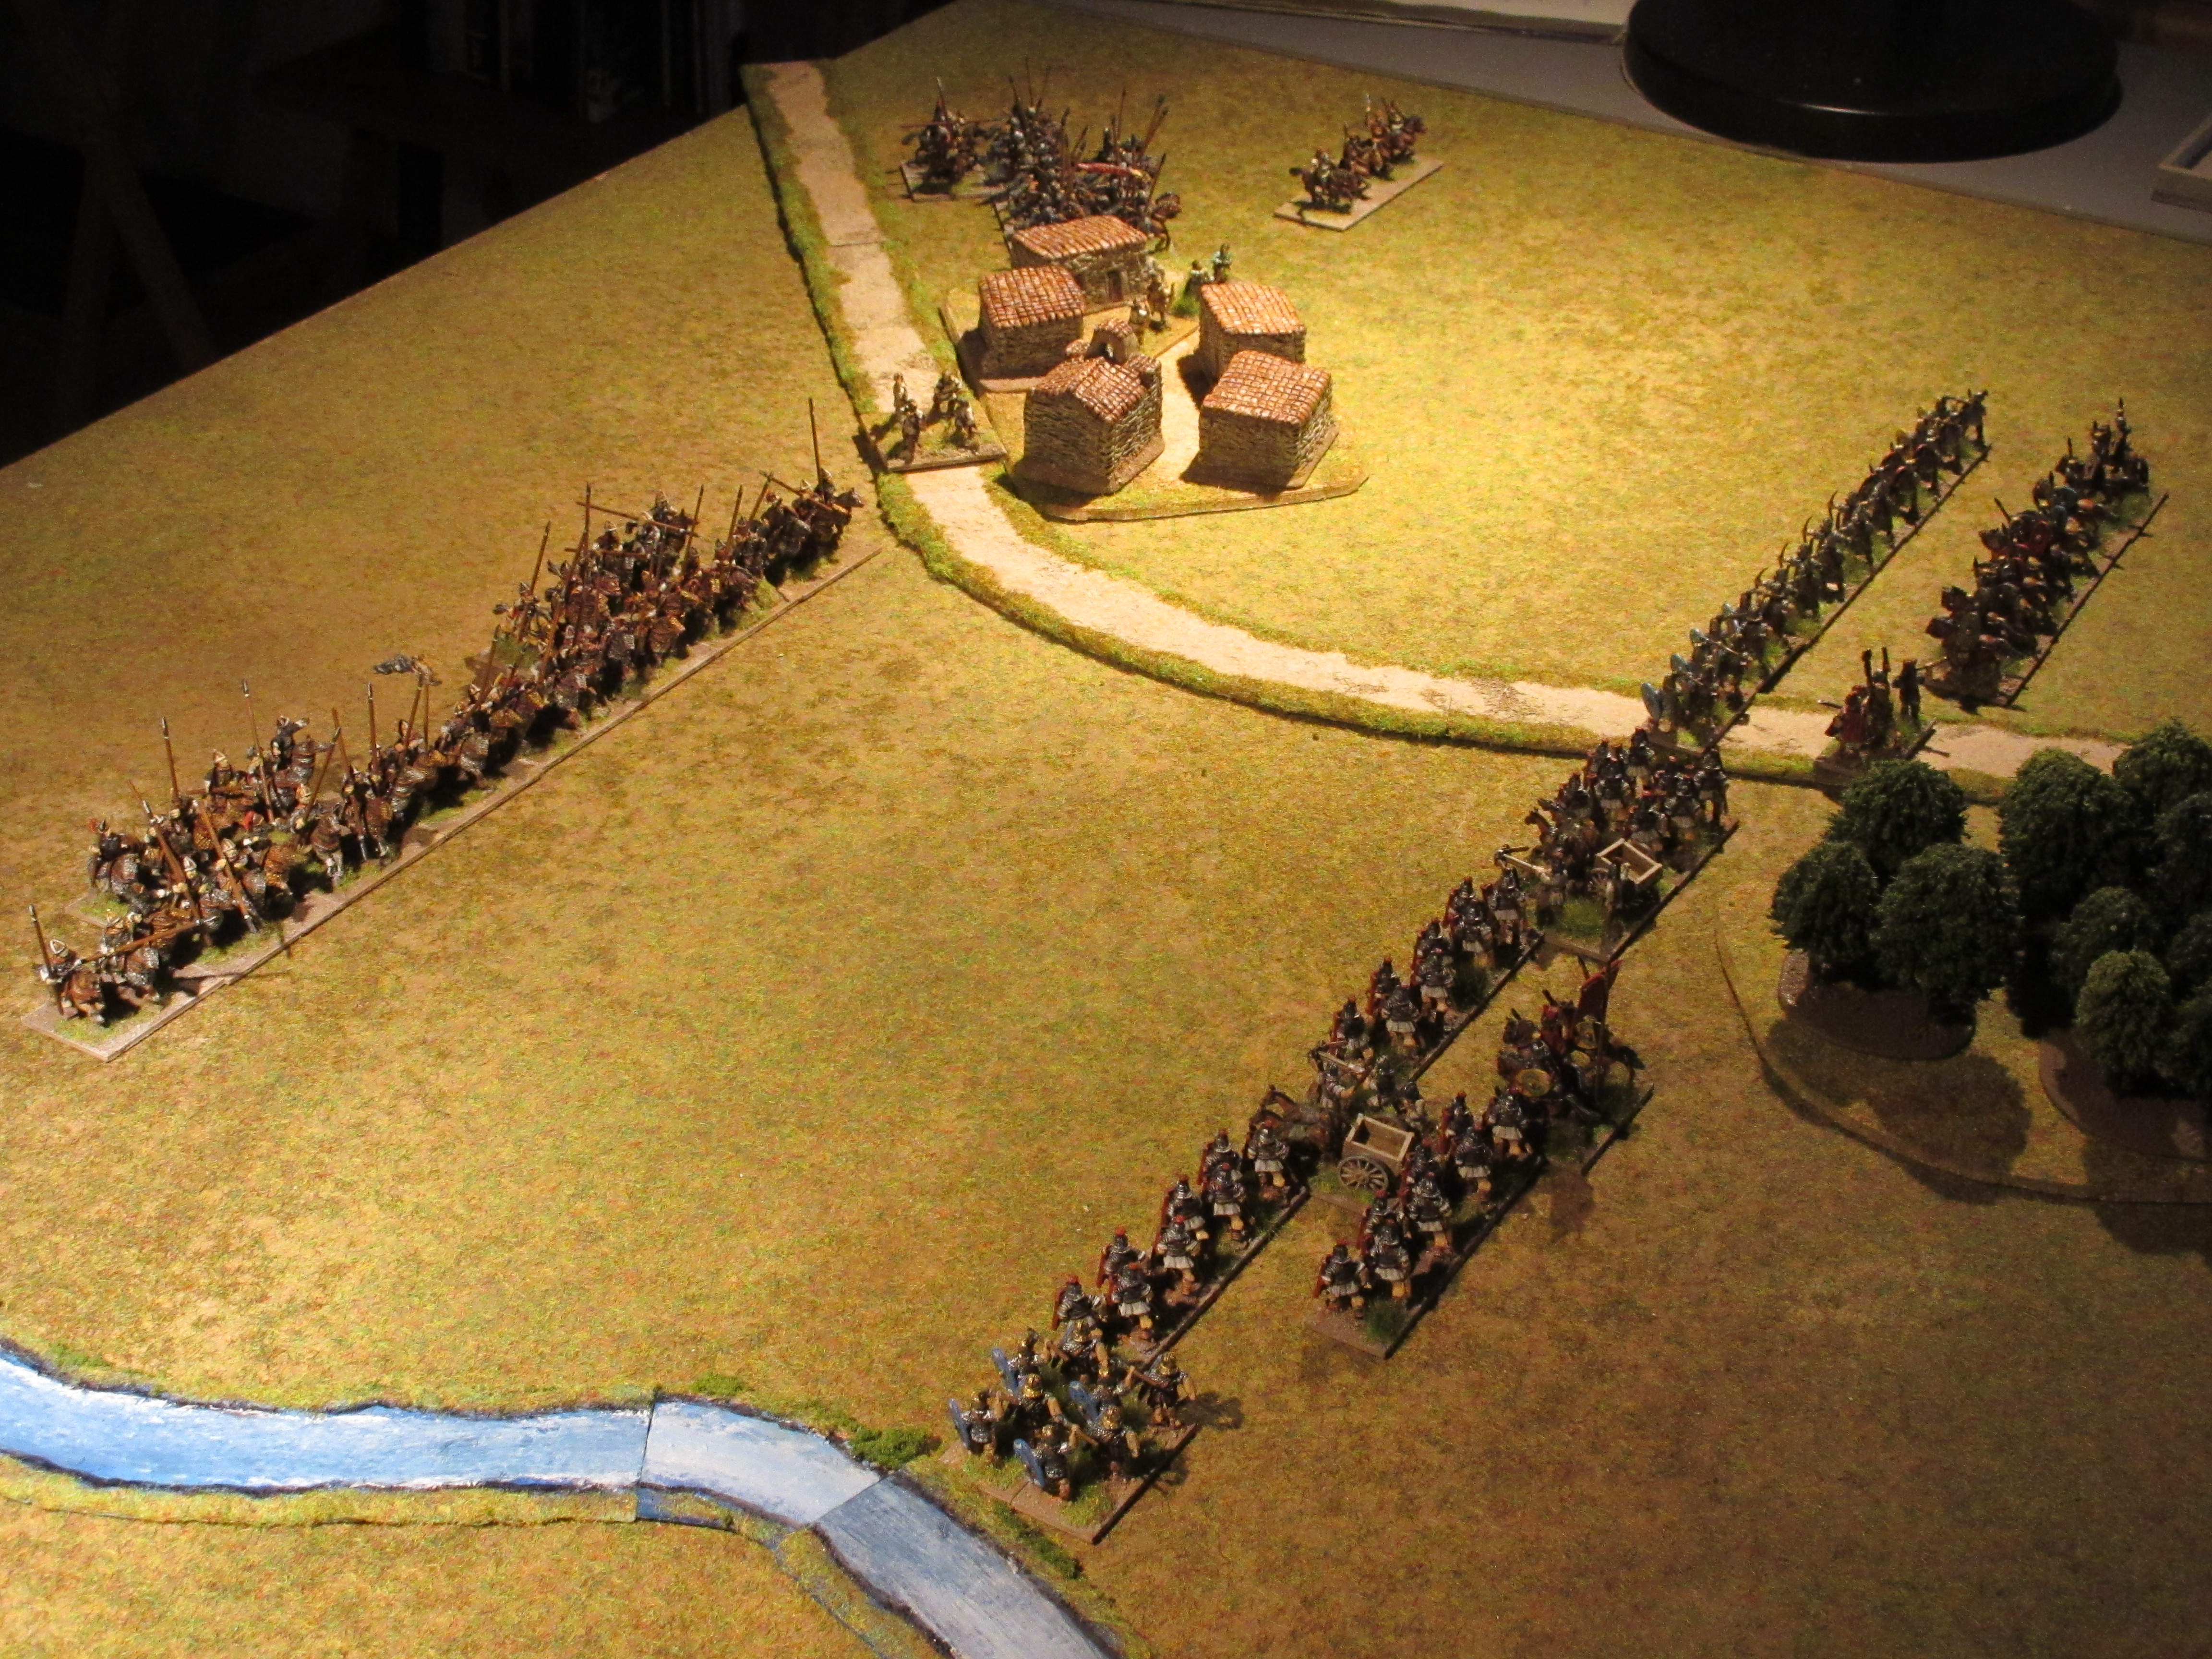
The following test games, the Iazyges invade an arable region of Pannonia, consisting of a BUA (hamlet), two woods, a road, and river. Both commands have 24 elements, the composition of which can be found below. 

Game one

Rome has placed its forces to defend in depth. Positioned between a river and hamlet a third line is placed further to the rear, guarding against any attempt at an encirclement. Opposing them, the Iazyges have split their force in two, attempting a two-prong attack, as Rome anticipated.

Remaining in its position, the Iazyges were handed the initiative and moved the main body of lancers slowly forward to allow the light horse time to distract the Roman left flank.

Beyond the village, Iazyges scouts engaged the Roman light horse, permitting the noble lancers to move closer in support. The movement against the Roman left was timed to allow the main body to wheel and face the Roman line.

Beating the Iazyge scouts, the Roman light horse retired to a position behind the village, well defended by three cohorts of auxilia. As the main enemy body closed the distance, it came into range of ballistae and archers. The resulting disorder enabled the Iazyges to make piecemeal attacks, with many being repelled. This continued for an hour (4 turns) causing light casualties on both sides.

In desperation, half the Iazyges lancers, led by their warlord, charged and broke the Roman line. The breaches, however, were filled by fresh troops from its reserve line. Beyond the village, the Iazyges continued to apply pressure eventually destroying Roman light horse to expose the Roman rear.

The last of the reserves turned to face the oncoming threat, but as Roman losses were far greater than those inflicted on the enemy, Rome had no alternative but to withdraw from the field. Iazyges 8 - 4


Game two

Implementing a different strategy, Rome deployed in an extended line with a portion of the legion and all the cavalry in reserve.

Seeing the village posed a problem for the enemy deployment, the Roman auxilia, with cavalry in support, moved toward the village in two groups. While this took place, the Roman main body remained in position, preparing to receive an expected Iazyges assault.

From the village, Roman auxilia were attacked by enemy skirmishers losing two cohorts of auxilia. Their elation was short, as all the skirmishers were destroyed by the equites nearby. The equites soon found themselves the target by Iazyges lancers nearby.

At this moment, the main body of Iazyges lancers attempted to time its charge against the legion.

Unfortunately, the main body of Iazyges faltered (low pips), allowing two cohorts of legionnaires and artillery to smash a column of lancers. Roman morale lifted prompting more aggressive action to swing the battle in Rome’s favour.

Gaining no further traction, the Iazyges main body could make no impression on the Roman line, sensing victory slipping from their grasp. Opposite the village, Rome destroyed enemy light horse and killed their sub-general. The Iazyges left wing leaderless, the Iazyges warlord called for a retreat. Rome 8 – 5


Observations.

Game one, taking advantage of the narrow field created by the river and village, Rome deployed in depth to conduct a passive game. By turn nine, casualties were 3 – 2 in Rome’s favour. The situation soon changed when the Iazyges launched suicidal attacks giving them a 6 - 4 lead. On the following turn, the Iazyges managed to cobble a group for one last charge to break Roman resistance.

Game two, Rome discarded the passive option and planned an aggressive defence. The village offered that opportunity. Moving toward the village, the auxilia split in two groups to threaten the interior flanks of the Iazyges cavalry. In response, the Iazyges sent troops to contend with the auxilia, resulting in fewer numbers meant to crush the Roman legion. The advance of the main body became disordered by ballistae bolts, requiring valuable time to redress their formation. 

Forced to fight two separate battles, Rome deepened the wedge between the two Iazyges wings and killed the Iazyges sub-general. The resulting confusion (out of command control of CinC) to a third of the army forced the warlord to end the battle.


Iazyges

16 x noble cavalry (3Kn), 2 x scouts (LH), 6 x skirmishing archers (Ps).

Early Imperial Roman

2 x General (Cv), 2 x equites (Cv), 8 x legionnaires (4Bd), 6 x auxilia infantry (4Ax), 2 x archers (4Bw), 2 x light horse (LH), 2 x artillery (Art).


Tuesday 19 December 2023

Rome vs. the Alani

Emperor Hadrian placed Lucius Flavius Arrianus as governor of Cappadocia, in 132 AD, a service he continued for six years. Not long after the Bar Kokhba revolt in Judea, the Alani crossed the Caucuses Mountains to invaded neighbouring territories, including Cappadocia, where their advance was halted by Arrian's legions.

Cassius Dio, Historia Romana

See also Arrian’s Array against the Alans.


Game one

Rome deployed its legion along a gentle hill, the rocky ground on its left was held by several cohorts of auxilia. More auxilia and archers were positioned on the right supported by the cavalry.

Anticipating Rome would not leave a defensive position, the Alani formed two groups, the largest would demonstrate against the Roman centre while the lancers of the second group would crush the open right flank. Alani horse archers on the extreme flanks would probe for any weakness.

The Alani centre remained halted giving the left flank time to seize a hill to protect the advance of the lancers. On the extreme right flank, Alani horse archers followed the advance of Roman auxilia among the rocks.

Satisfied with their alignment, the two groups of lancers slowly closed the distance to the Roman line. On the Roman left, the auxilia left their position among the rocks to catch the Alani horse archers off guard.

The approach of the Alani toward the Roman centre was met with a shower of ballistae bolts and arrows, bringing disorder among the Alani ranks. On the Alani right, the horse archers experienced further problems losing half its number to Roman auxilia.


Despite the disorder caused by bolts and arrows, the Alani tried in vain to charge the Roman line. The uncoordinated assaults generated no significant breakthroughs. Incurring significant losses, the Alani called for a retreat. Rome 8 – 4


Game two

Protected by scrub on both flanks, Rome interspersed its ballistae and archers between the legionnaires and auxilia. Positioned in a second line were more legionnaires and forming a third line, the cavalry.

For this battle, the Alani grouped all its lancers opposite the Roman position, anticipating the sheer weight of heavy cavalry would crush the Roman line.

The Alani centre remained in position to allow its horse archers to harass and turn the Roman flanks. Rome seized the moment to advance 80 paces forward to provoke the Alani lancers to action.

The move forward offered Alani horse archers to catch and destroy a cohort of legionnaires, but they paid dearly for their impetuousness.  

The Alani lancers advanced forward and were met with ballistae bolts and volleys of arrows. The disorder caused left too few groups to charge and engage the Roman line. Nonetheless, their charge did cause alarm when Alani lancers broke through to threaten the Roman second line.

The clash in centre now evolved into a soldier’s battle forming small combats. Casualties fell heavily on both sides bringing both forces to reach break point (7 – 7).

The Alani were quick to seize the moment to tip the balance in their favour. Alani 8 – 7.


Observations.

Roman options are limited with fighting in relative open ground (steppe). Game one, an opportunity opened for the auxilia to harass and destroy horse archers, forcing the Alani to send more troops from its centre and stabilise the right.

On the Roman right flank, the Alani greatly outnumbered their opposition to what could have developed in a desperate situation. But Rome held its ground, sending its reserve cavalry to deal with Alani lancers.

Game two was a tight game. The Alani centre became disordered when greeted by a hail of bolts and arrows. Alani had to make hard choices, spend pips redress the group or launch small groups in suicidal charges. Choosing the latter option did destroy five Roman elements, for the loss of two, in one bound.

Turn five, Rome took advantage of the chaos to even the score at 7 – 7. Quick off the mark, the Alani squeezed a Pyrrhic victory, destroying an element of auxilia.

Thursday 14 December 2023

Late Imperial Rome - eastern army

The collection of Late Imperial Roman replaces an older one sold earlier this year. That one had many Germanic figures filling the Roman ranks and would fit well for the Patrician era. Since their sale, I noticed Old Glory remodelled its Late Roman legionnaires and auxilia and I found my interest rekindled. 

Figures

The thirty-two elements form two commands, complete with extra elements added for optional choices. Selection of shield patterns and colour schemes were prepared in advance and painting began as soon as the figures arrived. Applique decorations were moulded on the figure making painting a breeze. All legionnaires had crests on their helmets, the auxilia only half. New shield patterns were selected for two elements as these would represent Germanic units (Armies and Enemies of Imperial Rome). 

Draco standards were added to the bases of the legionnaires and cataphract. Extra standards were placed with the light horse units, improving their appearance. The Chi-Rho vexillum and purple draco are for the CinC and the ‘victory’ banner, for the second in command. 

Shields

The collection represents an eastern army comprising of units selected from the Magister Militum Praesentalis (field army) and Magister Militum per Orientem (frontier army). The Notitia Dignitatum give no cavalry patterns for the eastern army, but, comparing both lists (western and eastern) similar units stationed in both western and eastern armies. These may be the same unit but, representing the senior and junior status of its recruitment. For the cavalry units, I kept the design, but varied the colour combination. 

Source: Notitia Dignitatum


Auxilia Infantry

Legionnaires and artillery


Cavalry and light horse 


Cataphract and Clibanarii


General and sub-general


Army in Battle Array


Tuesday 12 December 2023

Rome vs. Dacia

The conflicts with Rome are documented, but the Daci had other enemies, such as the Illyrians, the Boii of Bohemia (Gallic) and of course, among themselves.  These test games, Rome is the invader, giving the Daci terrain advantage. To be placed are two difficult hills, an additional difficult hill, a wood and BUA (hamlet).


Game one.

The Dacian battle line exceeded that of the Rome, as the legion deployed only half its strength in front to accommodate the auxilia, archers and ballistae. The other half of the legion formed a reserve with the equites in a second line.

The entire Dacian line moved a steady trot forward, skirmishers sprinted ahead to take a position opposite the Roman left flank.

Attacking both the Roman centre and the left flank, the assault came under heavy fire from archers and the ballistae, resulting in loss of cohesion. Despite this, the barbarian host moved forward.

Columns that did reach the Roman line were easily repulsed and pursued by legionnaires.

The clash had taken no more that an hour and a half (6 turns) and for all their fervour, the Dacian host could not break the Roman wall. Dacia broke off the combat after severe casualties. Rome 8 – 2


Game two

Rome found the Dacian host occupying a defensive position along the heights of two hills and continued to reach a village on its right wing. Rome decided it would demonstrate against the Dacian on the hill and concentrate its attack on the Dacian right centre. Here were the Sarmatian cavalry and Bastarnae falxmen.

Rome needed time to ready its troops into a proper line, meanwhile, the barbarian host did not stir from their position.

Rome ready, moved advanced its first line forward. Eager to cross swords, the Dacian host countered Rome’s attack by wheeling the main body bringing twice as many troops to meet the Roman line.

Anticipating a barbarian rush, Rome contracted its line to make room for the equites to charge a number of warband columns. Casualties began to mount.

During the clash of arms, the Sarmatian lancers slaughtered two cohorts of archers and continued their pursuit to catch two cohorts of legionnaires. From his forward position, the Dacian warlord could see half the lancers were repulsed and the remainder were cut to pieces. The battle had cost the Daci dear and their leader called for a retreat. Rome 8 – 3.


Observation.

In game two, both sides had their share of low pips, but Dacia did manage to concentrated twice as many elements against the Roman first line. The line should have cracked, in theory, but it did not. Once in contact, Roman blade continually pushed the enemy back, archers repeatedly repulsed the Sarmatians, until they could no longer. Adding their weight to the attack, the equites tipped the scales for Rome.


Thursday 7 December 2023

Rome vs. The Suevi

The Suevi (19 AD – 49 AD) army list II/47f, are active during the reign of three Roman emperors; Tiberius (14 – 37), Caligula (37 – 41) and Claudius (41 – 54). Researching any campaigns is made difficult as Roman historians referred to many tribes across the Rhine as Suevi, some use the term Suevi to describe a confederation of tribes, to include the Alemanni, Quadi and Marcomanni. The Suevi, as described by Tacitus, are a nomadic folk, having little interest in cultivating crops or raising domestic animals. What items they lacked were acquired through the frequent incursions made into the Roman Empire. 

Reviewing the DBMM army list for the Early German, a Suevian host may be commanded by a Sarmatian general (3Kn) leading a large number of Sarmatian cavalry. The Sarmatian, of the period, inhabited a region between the Marcomanni and Quadi or opposite the Roman provinces of Noricum or Moesia. 

The forces

The Suevi invade and find Rome defending an arable district complete with a BUA (hamlet), two woods, scrub, one difficult hill and a road. The invading Suevi comprise of four Sarmatian cavalry, sixteen warriors and four skirmishers.  Roman composition has remained unchanged with one exception, two bowmen (4Bw) have been replaced by two archers (Ps).


Game one

Rome have deployed the bulk of its forces between the village and hill and positioned on the opposite side of the village are the cavalry and auxilia commanded by the sub-general.

The Suevian warbands moved steadily forward, while the Sarmatian cavalry wheeled to attack the Roman right wing. Skirting the warband host and Sarmatians, skirmishers attempt to seize the village.

The Suevian host close the distance, but flanking columns are forced to negotiate around the village and steep hill. Skirmishers sent to take the village find this a harder task than anticipate as it is fiercely defended by Roman archers.

On contact, the Sarmatian lancers shatter the Roman wing leaving the auxilia scrambling to form a defensive line. Elsewhere, under a hail of ballistae bolts, the Suevian host lost its cohesion, but not its determination to close with the Roman line.

Despite the wave of uncoordinated assaults, the Roman centre broke, forcing the general to call a retreat. Suevi, 8- 5.


Game two

Rome deployed in two lines with auxilia interspersed among the legionnaires. With the exception of the light horse, all the cavalry were placed in the second line as a reserve.

The Suevi were forced, by the presence of the village, to split their infantry force in two wings. The Sarmatian cavalry were placed centrally to run down Roman infantry.

Rome held its centre in position while auxilia and skirmishers moved to a position to flank the barbarian horde. This left the unenviable task of holding off the second Suevian wing of 12 elements to three auxilia.  

Securing the village, Roman archers quickly found themselves at the rear of the barbarian host. As the host neared the Roman centre, ballistae proved effective at destroying enemy foot and cavalry, among the casualties was their warlord.

Leaderless, the warband host faltered, Rome smelled victory and attacked the host and the remaining Sarmatian cavalry. Casualties mounted on both sides, but the timely use of Roman cavalry effectively turned the battle. Rome victorious, 9 – 5.


Observations.

The combination of Sarmatian cavalry (3Kn) and warband proved a deadly combination in game one, sweeping all resistance away.

Game two lasted 8 turns and proved a meat-grinder with Rome holding a slight lead. On the Roman left, three auxilia held back three times their number giving the rest of the army enough time to crush the Sarmatian cavalry and Suevi warband.

Recommended viewing

The Suebi Reign of Terror. (YouTube)