Tuesday 25 July 2023

Roman Tour – the Sarmatae

Though Domitian’s reign lasted fifteen years, it is described as ‘ruthless but efficient’ by Alain Gowling in his review, The Emperor Domitian. Military campaigns were defensive in nature leading to the expansion of the Limes Germanicus. Nonetheless, every emperor pursues some military operation to strengthen their reign and in 83AD, a campaign against the Chatti earned him the title of Germanicus.  The following year Domitian ended Agricola’s campaign in Britain, reportedly for economic reasons, likely to curtail the governor’s popularity surpassing his own. A few years later, the war against the Dacians required troops to be withdrawn from various parts of the empire, however, the threat also involved additional players, the Suebi and Sarmatian. 

Striking early to raid northern Illyria, Sarmatian raiders attempted to recross the Danube. A legion and auxilia cavalry have been sent to intercept the raiders before they reach the Danube.    


Game one

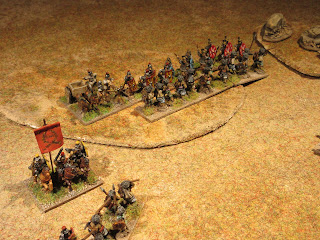
Rome positioned its legion and auxilia in two wings with the right positioned behind the intervening fields. The Sarmatae deployed the heavy cavalry in extended line matching the length of the Roman infantry. Sarmatae skirmishers are placed near the wood ready to support the cavalry.

The Sarmatae cavalry advance easily moved through the fields, however, the line was no longer contiguous but formed three lines in echelon with the right leading.

Roman equites on the right spurred forward to harass the enemy cavalry on the left, auxilia infantry on the left were given a similar objective and confront the Sarmatae light troops.

Both Sarmatian flanks under pressure required assistance. Stripping the centre of troops did ease the pressure on both flanks, but the main assault on the Roman line had been delayed. The hesitation was caught by Rome who launched a counter attack against the enemy right.

Caught off balance, the Sarmatae were forced to take a decisive action and gathered as many uncommitted cavalry to charge the Roman centre.

The stiff resistance by Roman infantry was unexpected and took a heavy toll on the Sarmatae cavalry to include the loss of their warlord causing the Sarmatians to rout. Rome 5+g – 0.


Game two

Renewing the fight, Rome deployed in a similar manner as before, the Sarmatae however, sent its skirmishers to infiltrate the wood on the Roman right.  

The intervening fields offered little obstacle as the Sarmatian cavalry, forming two wings, approached the Roman line at a steady pace. Sarmatian skirmishers successfully negotiated the woods fulfilling their objective, to harass the supporting auxilia.

The Sarmatian cavalry levelled their heavy lances charged the Roman line. As if struck by lightning, the Roman right disappeared under the hooves of the Sarmatian cavalry. The loss of the legion was immediately felt, sending the survivors to rout. Sarmatae 4 – 1.


Observation

Both battles were fought in relatively open terrain. This would normally be a death sentence for Rome, but a proactive Roman could turn events to his/her advantage. Both games, each side profited from favourable pip scores and a proactive Rome managed a victory in six turns. Game two, a passive Rome lost the battle in four.

 Early Imperial Roman

1 x General (Cv), 1 x equites (Cv), 4 x legionnaires (4Bd), 3 x auxilia infantry (4Ax), 1 x archers (4Bw or Ps), 1 x light horse (LH), 1 x artillery (Art).

Sarmatae

1 x General (3Kn), 7 x noble cavalry (3Kn), 1 x scouts (LH), 3 x skirmishing archers (Ps).
Friday 14 July 2023

Collision Course – Late Medieval era

By way of an introduction to the collision course variant for Jan, I had two identical Late Medieval German armies meet on a relatively open arable land, consisting of a small hamlet positioned along a road and woods. Readers may recall the ‘fine-tuning’ of the German lists I designed to reflect the feudal, city state, clerical and mercenary options for 1440 - 1518. Follow the link to read:  

Basically, the number of knights in wedge formation is reduced to one, retinue pikemen, classed as solid horde with nine figures placed on 40mm x 40mm bases, are present in both armies.


Battle

The vanguard and the first element of the main body of both forces are deployed on the table.

Four turns pass as both forces move out of column to line, one side producing three lines in echelon, the other reposition troops in two divisions.  


Another hour (4 turns) is needed to shuffle battle lines to charge distance. One side has wheeled its left division forcing the enemy to conform. The attack is supported by artillery and here, crossbowmen effectively fend off an attack by enemy knights.

As the lines close, both knights in wedge formation destroy enemy pike as they pass one another.   

Quick off the mark, a subsequent charge by supporting knights destroy the remaining pike to tip the balance and win the contest.


In retrospect

Both armies comprise a mix of troop types requiring at least four turns to shake columns into line and anther four to shuffle the lines to a point of no return. Once contact is made, a few turns are needed to reach a win.    

Having a perfect plan is nice, but be prepared for the unexpected. The sequence of elements within each column may cause delays as it moves from column to line as would the proximity of columns would cause a shortage of space.

Another cause of worry is the third column. A high score may bring the column ahead of plan or worse, consistent low pip scores, may delay its arrival.

Thursday 6 July 2023

Roman Tour - Meroitic Kushite

During the reign of Caesar Augustus, the conquest of Egypt gained for Rome an immense wealth and source of grain. It also had to contend with Meroitic raids on its southern frontier. In response, the Roman governor of Egypt, Publius Petronius, invaded Nubia and after a three-year long campaign a peace treaty between Augustus and Queen Amanirenas was made. Note, sourcing Gaius Petronius online, one can find a map illustrating the area of campaign in Nubia. 

From Augustus to the late 2nd century, a lucrative trade developed between the province of Egypt and Nubia and permanent garrisons were established at the First Cataract, Philae and Syene to protect the vital route. The region remained relatively quiet for the next two centuries. 

Game one.

Rome secured a gentle hill for its centre on a gentle hill and holding the rocky ground on its left were the auxilia. The Kushite horde advanced on the Roman centre ignoring the legion to its left.

The advance of the legion altered Kushite plans as troops were sent to face the threat on its left. 

The assault by the legion floundered offering the Kushite a moment to pursue its original plan and attack the Roman centre. 

The legion regained its second wind to inflict casualties among the tribesmen. The assault on the hill lacked the desired result prompting the Nubian general to call a general retreat. Rome 4 – 2.


Game two.

The Kushite battle array stretched nearly 750 paces prompting Rome to do likewise. Rome, forming two wings, positioned the legion on the right and auxilia with artillery on the left.

The Roman advanced against the enemy line confident of a second victory. 


Unfortunately, the Kushites were equally confident and proceeded to deal the legion a severe defeat. Kushites 4 – 0


Observations.

The Kushites had phenomenal good fortune to score well on successive combats against the legion. The loss of the auxilia on the far right was the icing on the cake. Romani ite domum.

Early Imperial Roman

1 x General (Cv), 1 x equites (Cv), 4 x legionnaires (4Bd), 3 x auxilia infantry (4Ax), 1 x archers (4Bw or Ps), 1 x light horse (LH), 1 x artillery (Art).

Meroitic Kushite

1 x General (Cv), 1 x cavalry (Cv), 2 x Meroitic archers (3Bw), 5 x tribal spearmen (Sp), 2 x tribal swordmen (4Bd), 1 x herdsmen with bows (Ps).


Recommended Reading

Strabo https://en.wikipedia.org/wiki/Strabo

Gaius Petronius https://en.wikipedia.org/wiki/Gaius_Petronius